从零开始的Arch Lab
[!CAUTION]
本笔记仅供参考,请勿抄袭。
声明
本笔记的写作初衷在于,笔者在做Arch Lab的时候受到Arthals学长很大启发,同时25Fall的计算机系统导论课程改制增加了10分的Lab测试(虽然往年的期中期末中也会有一两道Lab相关选择题,但分值不大)。故将心路历程写成此笔记,以便复习,并供后续选课同学参考。
Arch Lab简要介绍
Arch Lab是《计算机系统导论》课程的第4个Lab,对应教材第四章《处理器体系结构》和第五章《优化程序性能》。该Lab旨在加强同学们撰写Y86代码的能力,加深同学们对流水线结构及其优化过程的理解,以及鼓励同学们通过实现循环展开,深入了解循环展开的原理。
在Arch Lab中,共有三个Part,即Part A、Part B和Part C,分别为15pts、25pts和60pts(由此可见Part C难度之高)。在Part A中,需要实现三个Y86程序,分别为sum.ys、rsum.ys和bubble.ys,它们分别用于迭代求和链表元素、递归求和链表元素、以及对8字节整数块进行冒泡升序排序。在Part B中,需要为一个SEQ处理器拓展IOPQ指令,同时通过占位符填空,逐步优化一个二阶段流水线为四阶段流水线,使其具有较完善的转发和冒险处理逻辑。在Part C中,需要独立优化一个架构,同时优化ncopy函数,其功能为将一个包含len个元素的整数数组src复制到目标数组dst中,以通过数据测试,达到Arch Cost和CPE的理想值。
值得一提的是,此次Lab又受到了PKU助教团队的大幅魔改加强,具体体现在,Part A中,将原有的copy_block.ys改为bubble.ys,Part B中,增加了原Lab中没有的优化流水线环节,并将原有的HCL语言转换为Rust语言(技术支持来自HWY学长
),以及Part C中,修改原有的单一CPE优化要求为Arch Cost+CPE的混合优化要求,并加强了测试数据,此Lab的难度大致为中高,笔者用时约为 $12 \sim 14$ 小时。
在动手之前
代码美化
由于Part A和Part C中需要阅读并撰写Y86代码,因此笔者推荐安装Y86 Syntax Highlighter拓展,以获得更加的代码体验。
同时,在writeup中提到,由于Part B和Part C均使用基于Rust语言的架构,因此推荐安装rust-analyzer拓展,以享受语法检查、自动补全等功能。
安装Rust工具链
打开终端,在其中运行以下指令:
1
|
curl --proto '=https' --tlsv1.2 -sSf https://sh.rustup.rs | sh
|
安装完成后,可以通过rustup指令验证是否安装成功。
接着,需要安装指定版本的工具链(撰写README文件时为1.90),运行以下指令:
1
2
|
rustup install 1.90
rustup default 1.90
|
笔者需要提醒的是,类似Data Lab中的make指令,每次修改代码后,需要使用cargo build指令进行构建,方可进行测试。
每次运行cargo build后,会在项目目录下生成一个target文件夹,用于存放编译产物。
主要的可执行文件包括:
target\debug\yas:Y86-64汇编器target\debug\yis:Y86-64ISA 模拟器target\debug\ysim:Y86-64流水线模拟器target\debug\ydb:Y86-64调试模拟器
何为循环展开?
根据25Fall的经验,这个Lab发布的时候,如果跟着大班的进度,是一定学不到第五章的。
于是,笔者在此稍作介绍,因为该Lab需要的仅为简单的 $k \times 1$ 路展开,不涉及 $k \times k$ 路展开以及重新结合等知识,仅便于写Lab,要了解具体知识还得见《深入理解计算机系统》第5章第8节。
比较下列两个函数:
 1
 2
 3
 4
 5
 6
 7
 8
 9
10
11
12
13
14
15
16
17
18
19
20
21
22
23
24
25
26
27
|
void combine_4(vec_ptr v,data_t *dest){
    long i;
    long length=vec_length(v);
    data_t *data=get_vec_start(v);
    data_t acc=IDENT;
    for(i=0;i<length;i++){
        acc=acc OP data[i];
    }
    *data=acc;
    return ;
}

void combine5(vec_ptr v,data_t *dest){
    long i;
    long length=vec_length(v);
    long limit=length-1;
    data_t *data=get_vec_start(v);
    data_t acc=IDENT;
    for(i=0;i<limit;i+=2){
        acc=(acc OP data[i]) OP data[i+1];
    }
    for(;i<length;i++){
        acc=acc OP data[i];
    }
    *dest=acc;
    return ;
}
|
这是一种通过累计变量提高并行度的级数,其中,每次循环体内的body-statement重复执行的次数称为循环展开的路数,在combine5函数中,路数为2。
它的原理主要是在于可以通过累计变量来提高并行度,通过将不同的变量放到多个寄存器中,减少单个变量的关键路径上的依赖(即关键路径上的依赖),从而提高效率。
一个显然的想法是,尽量提高路数,但这样有什么弊端?
一个弊端是,当临时变量过多,编译器会将多出的变量存放到栈帧而非寄存器中,根据常识或者第六章的知识可以得知,访问内存比访问寄存器慢得多,这反而会拖累效率。
另一个弊端是,使用的寄存器越多,就需要额外处理余数部分,这部分实现较为麻烦,不过没关系,在Part C中,笔者会实现一个简单的跳转表进行余数处理~~(谁叫写的是Y86而不是X86呢)~~。
课本相关知识
- Y86-64代码及其相关含义
- SEQ架构及流水线架构
- 循环展开及其优化
Part A
运行tar -xvf archlab-handout.tar指令,得到该Lab所需的全部文件。
根据writeup,需要遵循x86-64的函数规定,包括参数传递、寄存器使用和栈操作规则等,包括保存和恢复使用的所有被调用者保存寄存器。
该Part需要在misc下编写文件。
sum.ys
参照asum.ys或者其他给出的ys文件,可以得到代码的其他部分:
 1
 2
 3
 4
 5
 6
 7
 8
 9
10
11
12
13
14
15
16
17
18
|
    .pos 0
    irmovq stack, %rsp # Set up stack pointer
    call main # Execute main program
    halt # Terminate program

    .align 8 # 测试用链表
ele1:
    .quad 0x00d
    .quad ele2
ele2:
    .quad 0x0e0
    .quad ele3
ele3:
    .quad 0xf00
    .quad 0

    .pos 0x200 # 定义栈的初地址
stack:
|
再参照给出的example.c中的sum_list函数,一步步翻译,得出以下代码:
 1
 2
 3
 4
 5
 6
 7
 8
 9
10
11
12
13
14
15
16
17
18
19
20
21
22
23
24
25
26
27
28
29
30
31
32
33
34
35
36
37
38
39
40
41
|
    .pos 0
    irmovq stack, %rsp # Set up stack pointer
    call main # Execute main program
    halt # Terminate program

    .align 8 # 测试用链表
ele1:
    .quad 0x00d
    .quad ele2
ele2:
    .quad 0x0e0
    .quad ele3
ele3:
    .quad 0xf00
    .quad 0

main:
    irmovq ele1, %rdi # 设置%rdi地址
    call sum_list # 调用sum_list
    ret

sum_list:
    xorq %rax, %rax # 将val置零
    jmp test

Loop:
    mrmovq (%rdi), %rsi # %rsi赋值为ls->val
    addq %rsi, %rax # val+=ls->val
    mrmovq 8(%rdi), %rdi # ls=ls->next
    jmp test

test:
    andq %rdi, %rdi # if ls!=nullptr,continue
    jne Loop
    jmp done # else jump to return

done:
    ret

    .pos 0x200
stack:
|
注意文件末尾需要空一行(指的是ret和.pos之间)
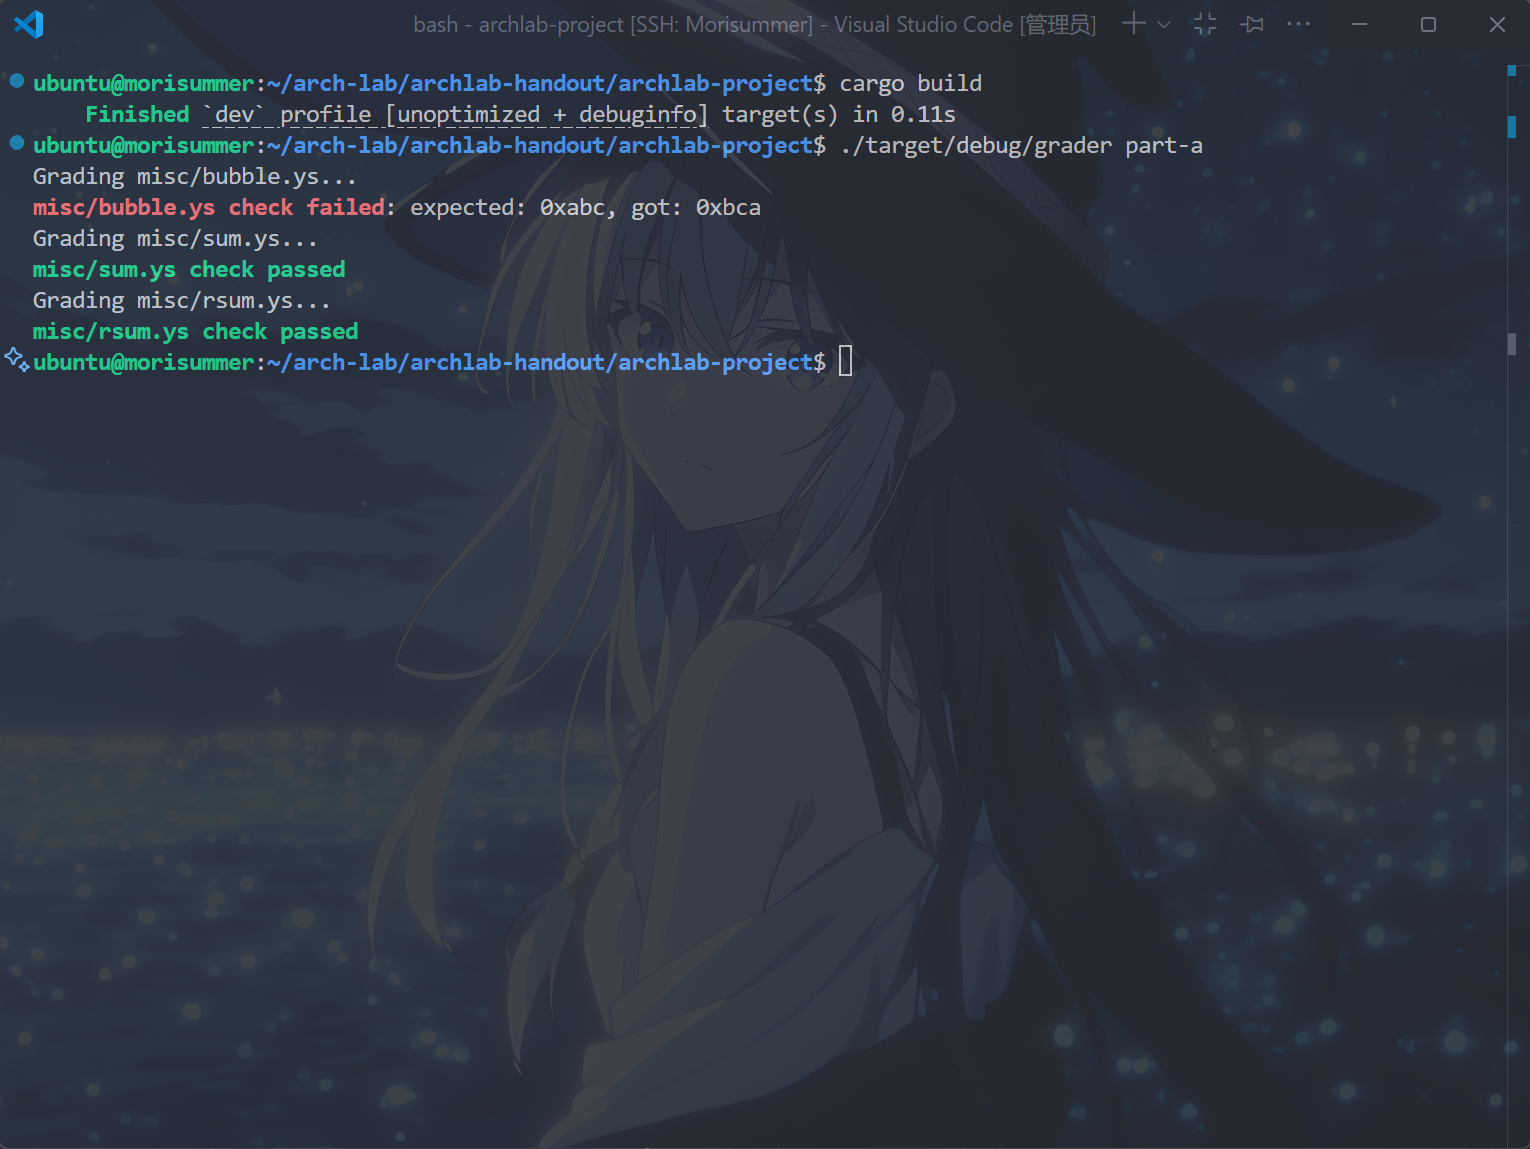
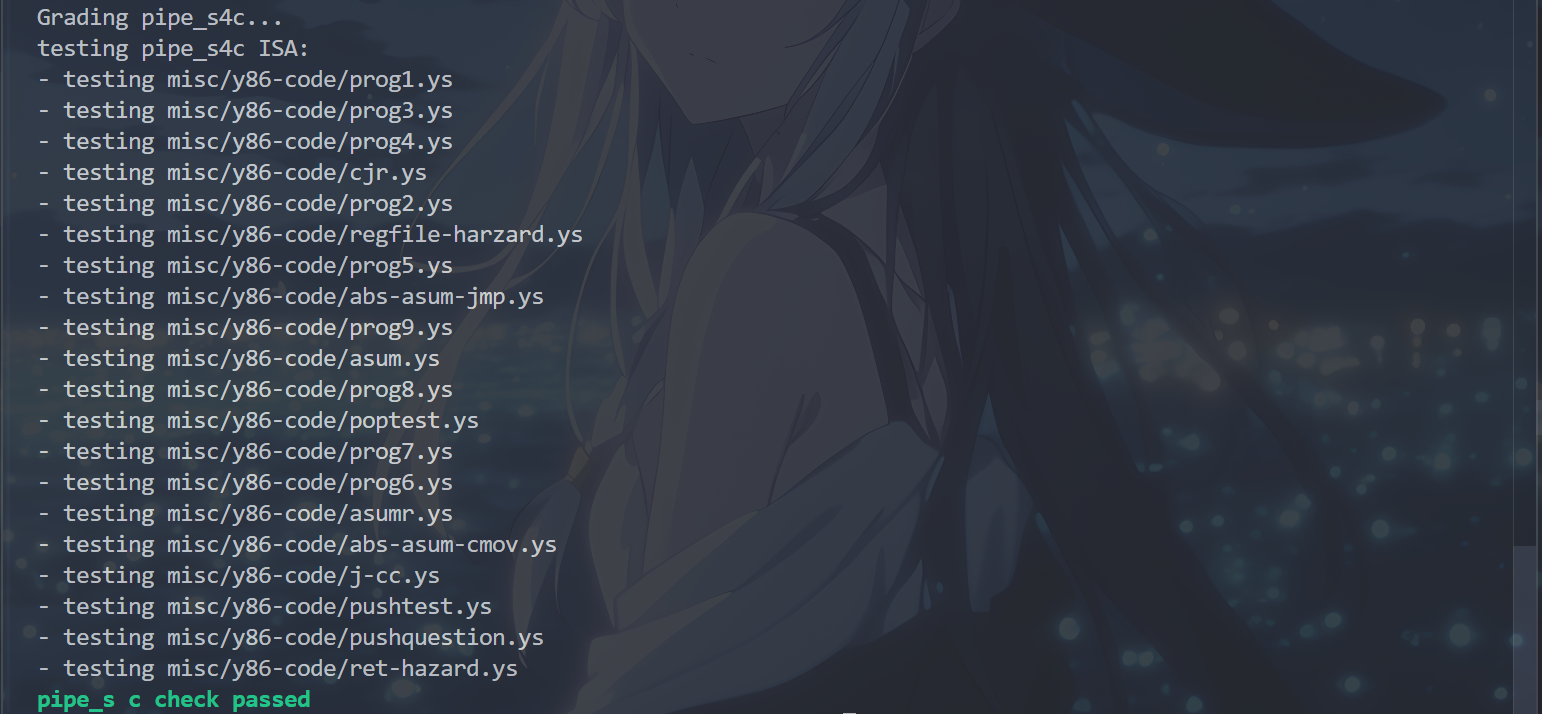
运行cargo build和./target/debug/grader part-a指令,得到以下结果,表示完成了sum.ys。

rsum.ys
代码的其他部分实现同样可以参照给出的其它文件写出。
根据writeup,此题需要以递归方式求和。
回忆第三章相关内容,需要将val值存在栈帧中,防止其在寄存器中被下层函数替换,其余实现细节翻译即可。
再参照example.c中的rsum_list函数,一步步翻译,得出以下代码:
 1
 2
 3
 4
 5
 6
 7
 8
 9
10
11
12
13
14
15
16
17
18
19
20
21
22
23
24
25
26
27
28
29
30
31
32
33
34
35
36
37
38
39
|
# As you've got familiar with Y86 after writting your first y86 code
# (bubble.ys), this code is left blank for you :)
    .pos 0
    irmovq stack, %rsp # Set up stack pointer
    call main # Execute main program
    halt # Terminate program

    .align 8 # 测试用链表
ele1:
    .quad 0x00d
    .quad ele2
ele2:
    .quad 0x0e0
    .quad ele3
ele3:
    .quad 0xf00
    .quad 0

main:
    irmovq ele1, %rdi
    call rsum_list # 调用rsum_list函数
    ret

rsum_list:
    andq %rdi, %rdi
    je done
    mrmovq (%rdi), %rsi
    pushq %rsi # 临时变量压栈保存
    mrmovq 8(%rdi), %rdi
    call rsum_list
    popq %rdx
    addq %rdx, %rax
    ret

done:
    ret

    .pos 0x200
stack:
|
运行cargo build和./target/debug/grader part-a指令,得到以下结果,表示完成了rsum.ys。
bubble.ys
根据writeup,需要原地对数组进行冒泡排序。
逐步对example.c中的bubble_sort进行翻译即可,得到以下代码:
 1
 2
 3
 4
 5
 6
 7
 8
 9
10
11
12
13
14
15
16
17
18
19
20
21
22
23
24
25
26
27
28
29
30
31
32
33
34
35
36
37
38
39
40
41
42
43
44
45
46
47
48
49
50
51
52
53
54
55
56
57
58
59
60
61
62
63
64
65
66
67
68
69
70
71
|
	.pos 0
	irmovq	stack,%rsp
	call main
	halt

	.align 8
array:
	.quad 0xbca
	.quad 0xcba
	.quad 0xacb
	.quad 0xcab
	.quad 0xabc
	.quad 0xbac

################################################################################
# You may want to modify this portion
# data:%rdi,count:%rsi,last:%rsi,常数8:%r13,i:%rcx

bubble_a:
	addq %rsi, %rsi
	addq %rsi, %rsi
	addq %rsi, %rsi # %rsi*=8
	addq %rdi, %rsi # %rdi需要保存以判断条件
	irmovq $8, %r13 # 设置常数8.便于遍历
	jmp test1


loop1:
	rrmovq %rdi, %rcx # i=data;
	subq %r13, %rsi # last--;
	jmp test2

loop2:
	mrmovq (%rcx), %r10 # %r10=*i
	mrmovq 8(%rcx), %r11 # %r11=*(i+1)
	rrmovq %rcx, %rbx # %rbx=i
	addq %r13, %rcx # i++
	subq %r10, %r11 # if *(i+1)<*i jmp to swap
	jl check
	jmp test2

check:
	mrmovq 8(%rbx), %r12
	rmmovq %r10, 8(%rbx)
	rmmovq %r12, (%rbx)
	jmp test2 # swap

test1:
	rrmovq %rsi, %rdx
	subq %rdi, %rdx # if last<=data break;
	jle done
	jmp loop1

test2:
	rrmovq %rcx, %r8 # %r8=i
	rrmovq %rsi, %r9 # %r9=last
	subq %r8, %r9 # if last<=i break;
	jle test1
	jmp loop2

main:
	irmovq array, %rdi
	irmovq $6, %rsi
	call bubble_a
	ret

done:
	ret

	.pos 0x200
stack:
|
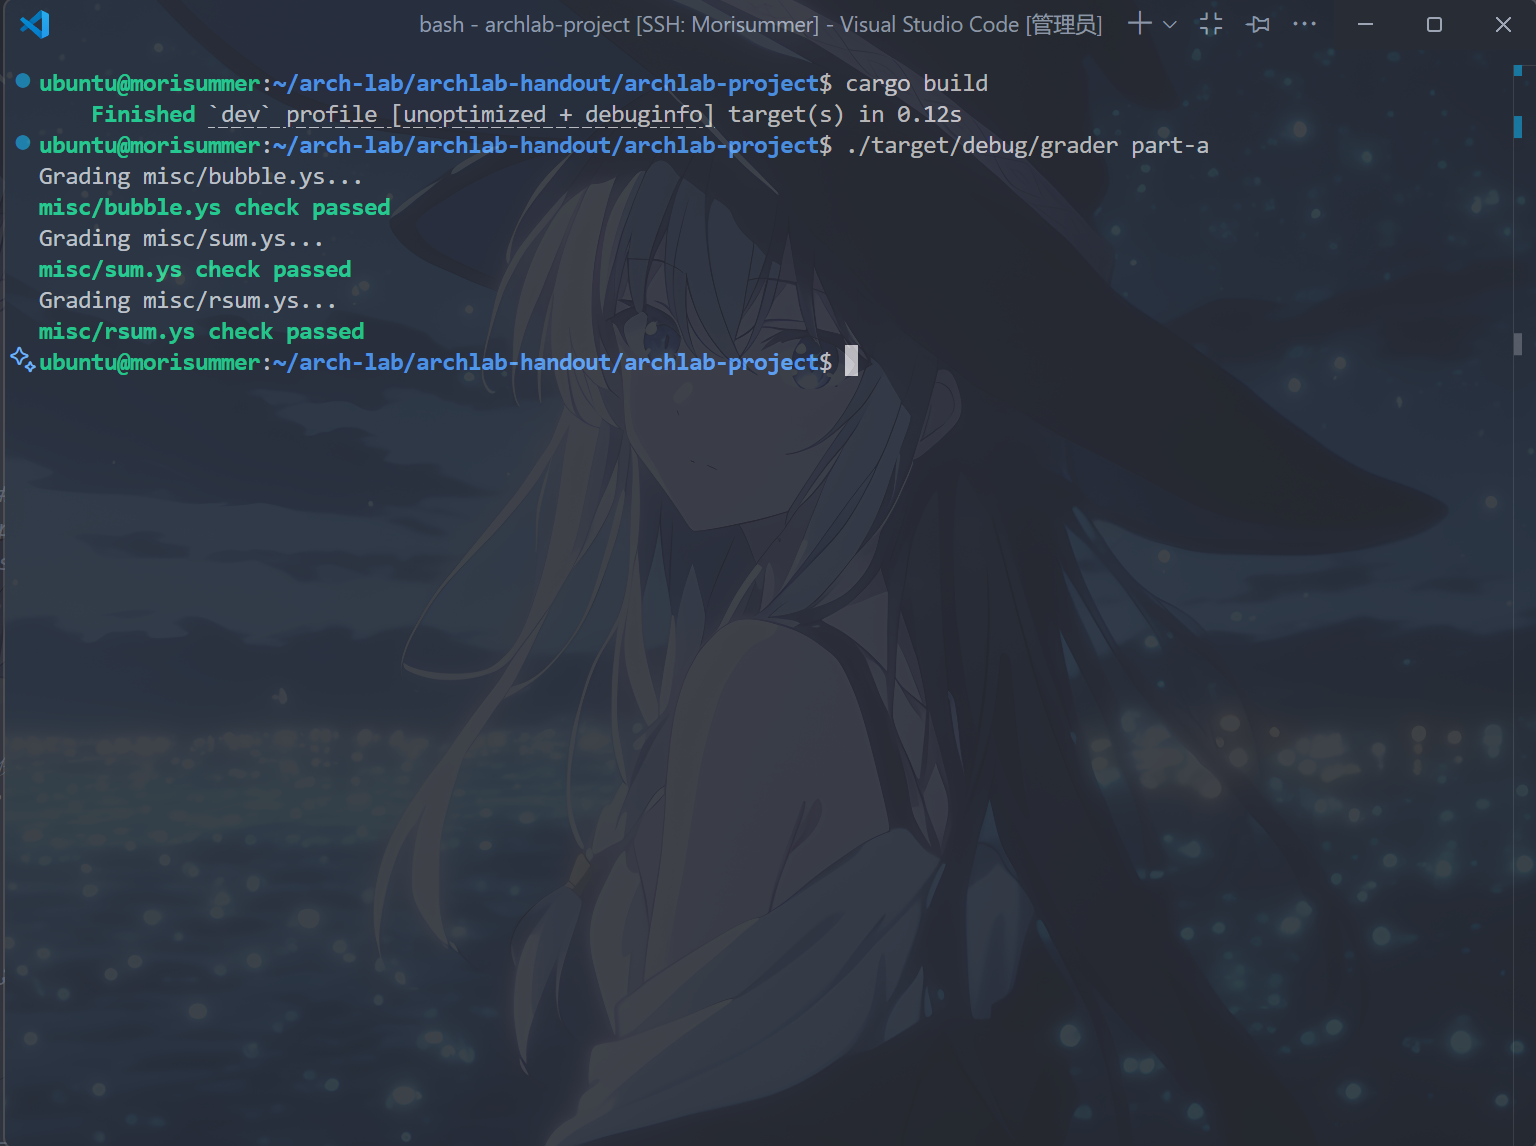
运行cargo build和./target/debug/grader part-a指令,得到以下结果,表示完成了part A。
Part B
根据writeup,该部分需要在/sim/src/architectures/extra目录下编写文件。
增添IOPQ指令
根据writeup,需要在seq_full.rs文件中编写文件,为SEQ架构增加IOPQ指令。
IOPQ指令:将某个立即数与寄存器中值进行OP运算,结果存储于该寄存器中,编码如下图。

大致可以参考OPQ和IOPQ的逻辑,解释该指令如下:
- 取指
- 取出
icode和ifun
- 取出
rA和rB,其中rA默认为F
- 取出
valC
- 预测下一条跳转地址
valP
- 译码
- 执行
- 在
ALU中计算valC OP VALB,得到valE
- 设置条件码
CC
- 访存
- 写回
得到大致逻辑后,就可以着手增加指令了。
取指阶段,由于IOPQ是有效指令、需要使用寄存器和常数,则在instr_valid、need_regids和need_valC中添加IOPQ指令,如下:
 1
 2
 3
 4
 5
 6
 7
 8
 9
10
|
bool instr_valid = icode in // CMOVX is the same as RRMOVQ
    { NOP, HALT, CMOVX, IRMOVQ, RMMOVQ, MRMOVQ,
    OPQ, JX, CALL, RET, PUSHQ, POPQ };

// Does fetched instruction require a regid byte?
bool need_regids =
    icode in { CMOVX, OPQ, PUSHQ, POPQ, IRMOVQ, RMMOVQ, MRMOVQ };

// Does fetched instruction require a constant word?
bool need_valC = icode in { IRMOVQ, RMMOVQ, MRMOVQ, JX, CALL };
|
译码阶段,由于IOPQ需要取出srcB,得到dstE,因此在srcB和dstE中添加IOPQ指令,如下:
 1
 2
 3
 4
 5
 6
 7
 8
 9
10
11
12
13
14
|
// What register should be used as the B source?
u8 srcB = [
    icode in { OPQ, RMMOVQ, MRMOVQ, IOPQ } : ialign.rB;
    icode in { PUSHQ, POPQ, CALL, RET } : RSP;
    true : RNONE; // Don't need register
];

// What register should be used as the E destination?
u8 dstE = [
    icode in { CMOVX } && cnd : ialign.rB;
    icode in { IRMOVQ, OPQ, IOPQ} : ialign.rB;
    icode in { PUSHQ, POPQ, CALL, RET } : RSP;
    true : RNONE; // Don't write any register
];
|
执行阶段,由于需要传入valC和valB,并且需要改变alufun(使其不为默认加法器),并设置条件码,因此修改aluA、aluB、alufun和set_cc如下:
 1
 2
 3
 4
 5
 6
 7
 8
 9
10
11
12
13
14
15
16
17
18
19
20
21
22
23
24
25
|
// Select input A to ALU
u64 aluA = [
    icode in { CMOVX, OPQ } : reg_read.valA;
    icode in { IRMOVQ, RMMOVQ, MRMOVQ, IOPQ } : ialign.valC;
    icode in { CALL, PUSHQ } : NEG_8;
    icode in { RET, POPQ } : 8;
    // Other instructions don't need ALU
];

// Select input B to ALU
u64 aluB = [
    icode in { RMMOVQ, MRMOVQ, OPQ, CALL,
              PUSHQ, RET, POPQ, IOPQ } : reg_read.valB;
    icode in { CMOVX, IRMOVQ } : 0;
    // Other instructions don't need ALU
];

// Set the ALU function
u8 alufun = [
    icode in { OPQ, IOPQ } : ifun;
    true : ADD;
];

// Should the condition codes be updated?
bool set_cc = icode in { OPQ, IOPQ };
|
访存阶段,由于IOPQ无访存阶段,因此无需修改。
写回阶段,代码中没有需要填写的空,也无须修改。
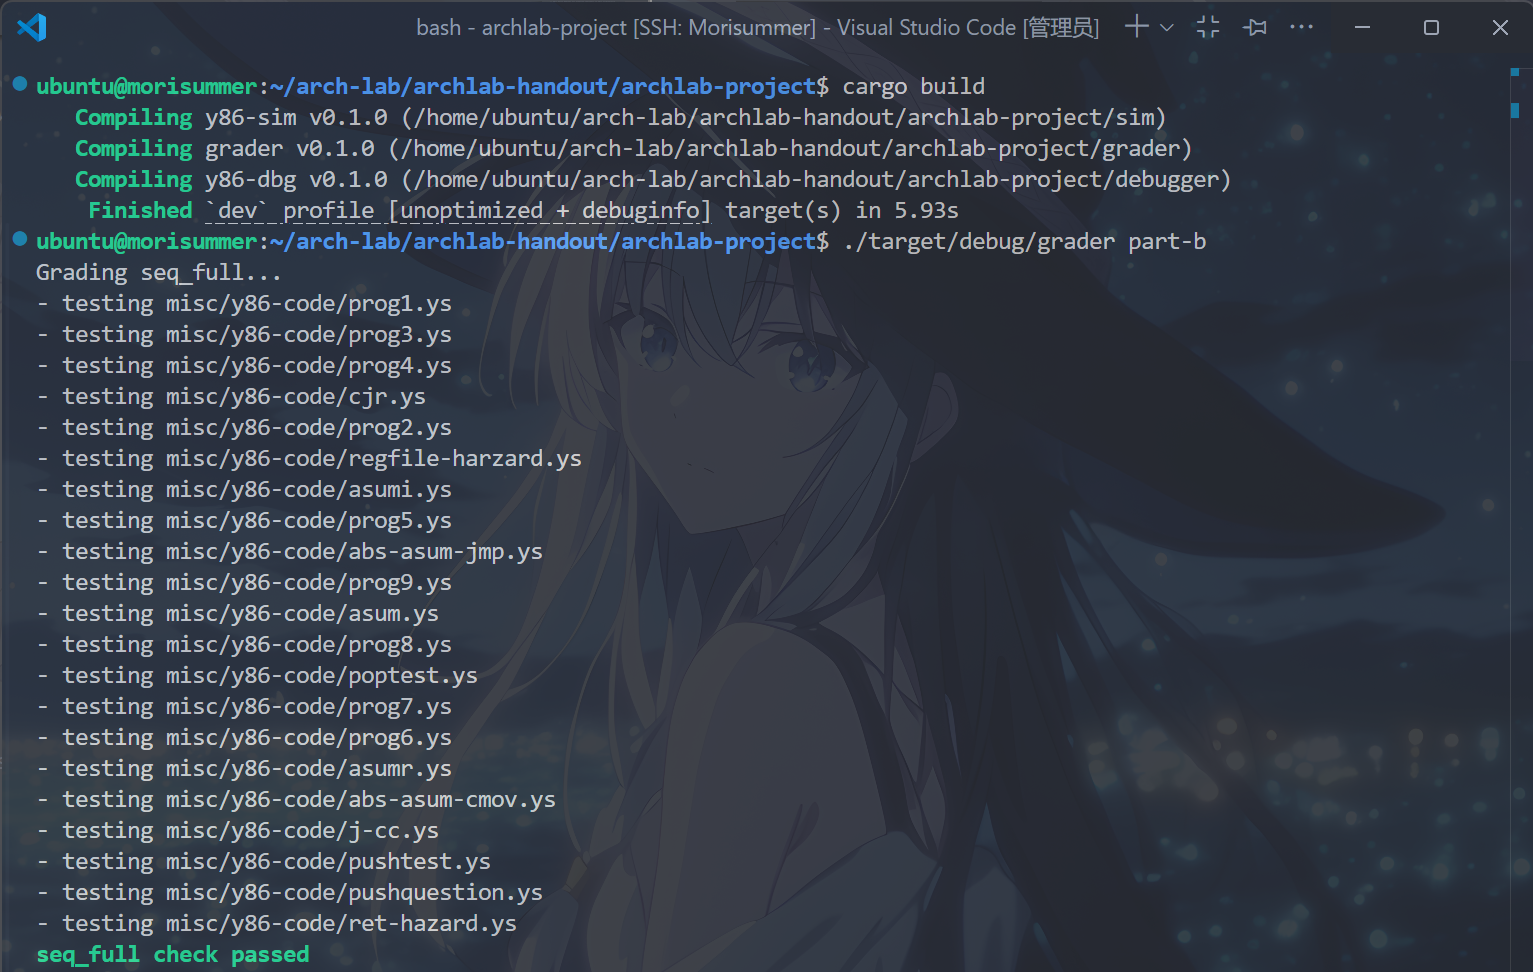
运行cargo build和./target/debug/grader part-b指令,得到以下结果,表示完成了增加IOPQ环节:
P3a
根据writeup,文件提供了一个由SEQ+改进的二级流水线架构pipe_s2.rs,需要逐步完善pipe_s3.rs的四个三级流水线。
在三级流水线中,取指和译码阶段独立,其它阶段合并为执行阶段。需要在每个文件中的占位符里填上合适的代码。
好在,学长在注释中,给出了足够提示,可以根据提示来判断结果。
根据注释,在P3a中,相比P2,将译码阶段与后续的阶段分开,但这会引入以下问题:
reg_read和reg_write位于不同的流水线阶段,可能导致数据冒险。- 用于计算
f_pc的操作数被拆分到不同的流水线阶段,这是不正确的,因为不同流水线阶段的值属于不同的指令。
- 从而,需要对流水线寄存器实现停顿和气泡控制,确保等待一个额外周期。
取指阶段,根据注释和课本知识,容易了解到此处应该填上默认跳转以及RET语句的f_pc,如下:
注意由于此处因为无访存阶段和写回阶段,因此RET前应填E.icode和e_valM。
 1
 2
 3
 4
 5
 6
 7
 8
 9
10
11
12
13
14
15
16
|
// What address should instruction be fetched at?
// We use D.icode because we use the icode in the last cycle to determine the
// next PC.
u64 f_pc = [
    // Call.  Use instruction constant
    // If the previous instruction is CALL, the constant value should be the next PC
    // valC is from Fetch Stage, thus the last cycle
    D.icode == CALL : D.valC;
    // Taken branch.  Use instruction constant
    E.icode == JX && e_cnd : E.valC;
    // Completion of RET instruction.  Use value from stack
    // valM is from DEMW stage, thus the current cycle
    E.icode == RET : e_valM;
    // Default: Use incremented PC
    1 : F.valP;
];
|
在第三阶段的执行阶段,由于若CMOVXX指令不满足,则将e_dstE置为空,如下:
1
2
3
4
|
u8 e_dstE = [
    E.icode == CMOVX && !e_cnd : RNONE;
    1 : E.dstE;
];
|
在处理冒险时,由于当译码阶段需要取出的寄存器被第三阶段中的访存/写回使用,可能产生数据冒险。同时,产生数据冒险时,则需要在取指阶段和译码阶段各进行暂停。由以上机制补全代码如下:
 1
 2
 3
 4
 5
 6
 7
 8
 9
10
11
12
13
|
// If a data hazard occurs, we need to wait for the data to be written to the
// registers before proceeding.
bool data_harzard = d_srcA != RNONE && d_srcA in { e_dstE, e_dstM }
    || d_srcB != RNONE && d_srcB in { e_dstE, e_dstM};

bool f_stall = D.icode in { JX, RET } || data_harzard;

@set_stage(f, {
    stall: f_stall,
});


bool d_stall = data_harzard;
|
运行cargo build和./target/debug/grader part-b指令,出现以下结果,表示完成了P3a:

P3b
根据顶部注释,得知P3a的气泡和暂停频率过高,导致效率低下,应该补充转发逻辑解决问题。
由于转发逻辑不影响取指阶段,因此取指阶段补充与P3a中相同。
在译码阶段,要求完善d_valA和d_valB的转发逻辑,根据d_srcA/d_srcB是否等于e_dstE/e_dstM来填写,如下:
 1
 2
 3
 4
 5
 6
 7
 8
 9
10
|
u64 d_valA = [
    d_srcA == e_dstE : e_valE;
    d_srcA == e_dstM : e_valM;
    1: reg_read.valA;
];
u64 d_valB = [
    d_srcB == e_dstE : e_valE;
    d_srcB == e_dstM : e_valM;
    1: reg_read.valB;
];
|
执行阶段需要填写的e_dstE逻辑,由于仍是关于CMOVX指令的处理逻辑,与P3a中相同。
由于使用转发逻辑处理数据冒险,因此流水线寄存器控制中不再出现数据冒险变量,此时仅处理JX指令和RET指令的情况,填写代码如下:
 1
 2
 3
 4
 5
 6
 7
 8
 9
10
|
bool f_stall = D.icode in { JX, RET };

@set_stage(f, {
    stall: f_stall,
});


bool d_stall = false;

bool d_bubble = D.icode in { JX, RET };
|
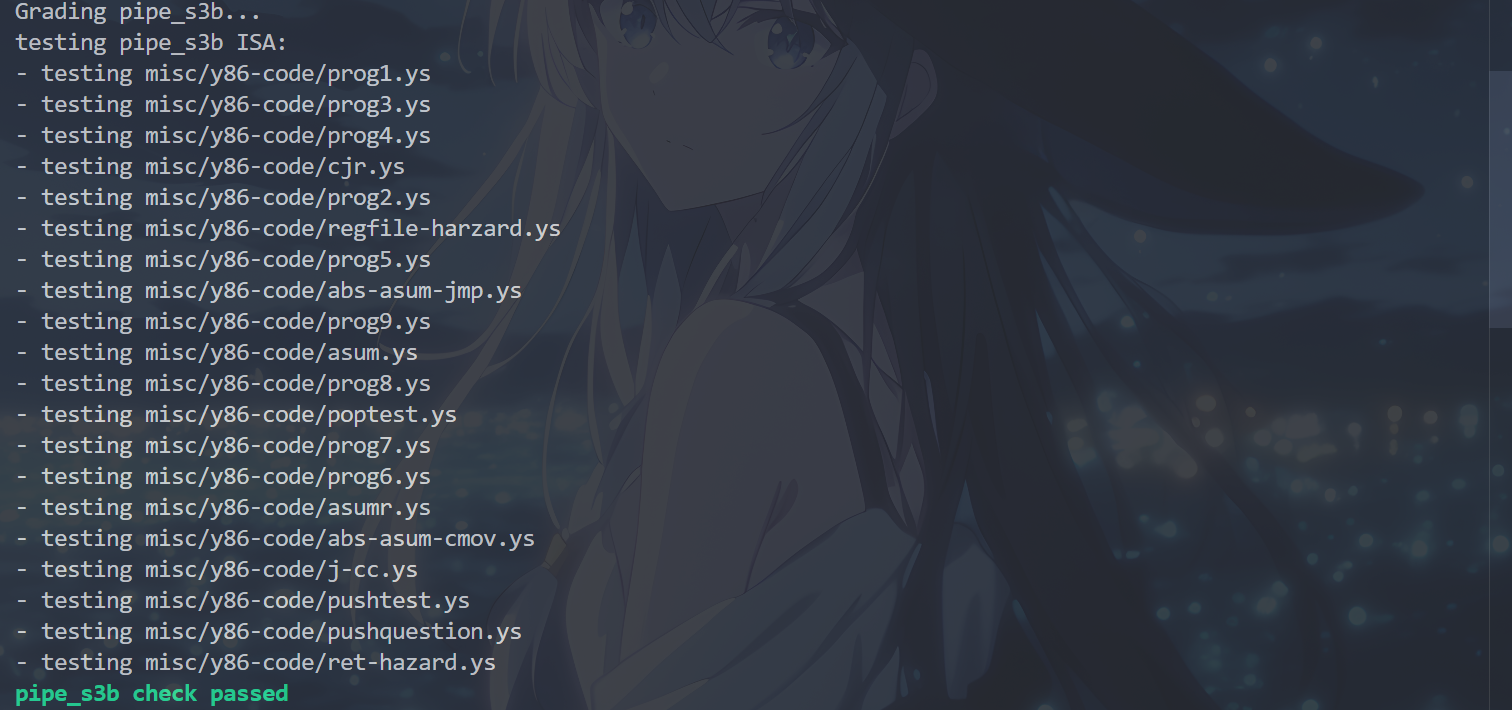
运行cargo build和./target/debug/grader part-b指令,出现以下结果,表示完成了P3b:
P3c
根据顶部注释,得知P3b的性能提升并不显著,因为在遇到JX指令时总是插入暂停或者气泡。实际上,可以通过分支预测来实现优化。
在取指阶段,分支预测逻辑表明,应当执行总是跳转策略,当不满足条件码时,才将预测的下一条指令地址记为E.valP,填写代码如下:
 1
 2
 3
 4
 5
 6
 7
 8
 9
10
11
12
13
14
15
16
|
// What address should instruction be fetched at?
// We use D.icode because we use the icode in the last cycle to determine the
// next PC.
u64 f_pc = [
    // Call.  Use instruction constant
    // If the previous instruction is CALL, the constant value should be the next PC
    // valC is from Fetch Stage, thus the last cycle
    D.icode == CALL : D.valC;
    // Branch misprediction.  Use incremental PC
    E.icode == JX && !e_cnd : E.valP;
    // Completion of RET instruction.  Use value from stack
    // valM is from DEMW stage, thus the current cycle
    E.icode == RET : e_valM;
    // Default: Use predicted PC
    1 : F.pred_pc;
];
|
在译码阶段,转发逻辑的实现与分支预测逻辑/冒险处理无关,因此译码阶段的填空与P3B相同。
在执行阶段,CMOVXX指令的处理与分支预测逻辑/冒险处理无关,因此执行阶段的填空与P3B相同。
最后,需要多处理分支预测错误的情况,即JXX冒险。根据注释,当在执行阶段检测到分支预测错误,则当前处于译码阶段的指令不可用,需要在下一个执行阶段插入一个气泡顶掉它。
同时,如果RET冒险和JXX冒险同时出现,那么JXX冒险会被先执行,而RET冒险会被忽略,此时取指阶段无须暂停,且译码阶段无须插入气泡。
根据以上原理,填写代码如下:
 1
 2
 3
 4
 5
 6
 7
 8
 9
10
11
12
13
14
15
16
17
18
19
20
21
22
23
24
25
26
|
// If a branch misprediction is detected during the Execute stage, it means that
// the instruction currently in the Decode stage is invalid. Therefore, the next
// cycle’s Execute stage needs to insert a bubble.
bool branch_mispred = E.icode == JX && !e_cnd;

// If the current instruction in the Decode stage is a RET, then the instruction
// in the current Fetch stage is invalid. Therefore, the next cycle’s Fetch stage
// needs to insert a bubble.
bool ret_harzard = D.icode == RET;

// If both a branch misprediction and a RET hazard occur at the same time, since
// the jump instruction is executed before the RET, the RET should not have been
// executed, so a stall is not needed.
bool f_stall = ret_harzard && !branch_mispred;

@set_stage(f, {
    stall: f_stall,
});


bool d_stall = false;

// If both a branch misprediction and a ret hazard occur at the same time,
// since the jump instruction is executed before the RET, the RET should not
// have been executed. Therefore, a bubble is not needed.
bool d_bubble = ret_harzard && !branch_mispred;
|
运行cargo build和./target/debug/grader part-b指令,得到以下结果,表示完成了P3c:

P3d
根据顶部注释,相比P3c,为了避免结构冒险,将寄存器的读取和写入合并成同一个设备reg_file,操作按照先写后读的原则进行。
取指阶段的预测逻辑并不受寄存器合并影响,因此与P3c中相同。
译码阶段的转发逻辑并不受寄存器合并影响,因此与P3c中相同。
执行阶段的CMOVX并不受寄存器合并影响,因此与P3c中相同。
分支预测逻辑并不受寄存器合并影响,因此与P3c中相同。
P.S:笔者做的时候抄了一遍就过了,非常惊讶,可能是书上并没有出现结构冒险的相关论述,因此在Lab中也不做相关要求,仅作演示。
运行cargo build和./target/debug/grader part-b指令,得到以下结果,表示完成了P3d:

P4a
根据顶部注释,在P4系列中,将执行阶段与其它阶段分开,以减少计算依赖层级。在P3d中,优化了硬件逻辑,避免了拆分阶段中可能的结构冒险(原来如此)!
取指阶段,由于增加了访存阶段,而此时取出RET指令的跳转地址仍在写回阶段,因此其属于在第四阶段进行传递的变量,应当写成小写:
 1
 2
 3
 4
 5
 6
 7
 8
 9
10
11
12
13
14
15
16
|
// What address should instruction be fetched at?
// We use D.icode because we use the icode in the last cycle to determine the
// next PC.
u64 f_pc = [
    // Call.  Use instruction constant
    // If the previous instruction is CALL, the constant value should be the next PC
    // valC is from Fetch Stage, thus the last cycle
    D.icode == CALL : D.valC;
    // Branch misprediction.  Use incremental PC
    E.icode == JX && !e_cnd : E.valP;
    // Completion of RET instruction.  Use value from stack
    // valM is from DEMW stage, thus the current cycle
    M.icode == RET : m_valM;
    // Default: Use predicted PC
    1 : F.pred_pc;
];
|
在译码阶段,由于增加了访存阶段,因此转发逻辑中的e_dstM应改为m_dstM,填写代码如下:
 1
 2
 3
 4
 5
 6
 7
 8
 9
10
|
u64 d_valA = [
    d_srcA == e_dstE : e_valE;
    d_srcA == m_dstM : m_valM;
    1: reg_file.valA;
];
u64 d_valB = [
    d_srcB == e_dstE : e_valE;
    d_srcB == m_dstM : m_valM;
    1: reg_file.valB;
];
|
执行阶段,由于CMOVXX指令无访存阶段,因此其逻辑与P3d相同。
在流水线寄存器控制中,分支错误预测的逻辑由于不受增加的访存阶段影响,与P3a相同。而RET冒险则因为多出了执行阶段,在五阶段流水线中,只要译码、执行、访存中任一检测到RET,即构成RET冒险,此处则因为第四阶段包含访存和写回两个阶段,因此需要判断RET是否在译码和执行两个阶段中。
同时,在P4a中,增加了加载/使用冒险的处理逻辑,即若执行阶段检测到MRMOVQ或POPQ指令,且构成数据冒险(即执行阶段接下来的访存阶段将要访问的位置的值,会在执行阶段被下一条指令使用),因此需要将其后全部指令,暂停一个周期,并且用一个bubble占据执行阶段空位后再进行转发。
根据以上原理,填写出以下代码:
 1
 2
 3
 4
 5
 6
 7
 8
 9
10
11
12
13
14
15
16
17
18
19
20
21
22
23
24
25
26
27
28
29
30
31
32
33
34
35
36
37
38
39
40
41
42
43
44
45
46
|
// If a branch misprediction is detected during the Execute stage, it means that
// the instruction currently in the Decode stage is invalid. Therefore, the next
// cycle’s Execute stage needs to insert a bubble.
bool branch_mispred = E.icode == JX && !e_cnd;

// If a RET instruction is detected in either the Decode or Execute stage, then
// the instruction in the current Fetch stage is invalid. Therefore, a bubble
// needs to be inserted in the Fetch stage for the next cycle.
//
// In fact, when E.icode == RET, the instruction in the current Decode stage is
// also invalid, but because the D.icode in the previous cycle was RET, at this
// point D.icode == NOP, so there's no need to add a condition for e_bubble.
bool ret_harzard = RET in { D.icode, E.icode };

// This instruction needs to read from a register whose data was loaded from
// memory by the previous instruction, but the previous instruction is still in
// the Execute stage, causing a data hazard.
bool load_use_harzard = E.icode in { MRMOVQ, POPQ } && E.dstM in { d_srcA, d_srcB };
// an equivalent expression:
// bool load_use_harzard = E.dstM != RNONE && E.dstM in { d_srcA, d_srcB };

// If both a branch misprediction and a RET hazard occur at the same time,
// since the jump instruction is executed before the RET, the RET should not be
// executed, so no stall is required.
bool f_stall = ret_harzard && !branch_mispred || load_use_harzard;

@set_stage(f, {
    stall: f_stall,
});


bool d_stall = load_use_harzard;

// If both a branch misprediction and a RET hazard occur at the same time,
// since the jump instruction is executed before the RET, the RET should not
// have been executed, so a bubble is not needed.
//
// Actually, ret_harzard and d_stall cannot be true at the same time.
bool d_bubble = ret_harzard && !branch_mispred && !d_stall;

@set_stage(d, {
    stall: d_stall,
    bubble: d_bubble,
});

bool e_bubble = branch_mispred || load_use_harzard;
|
运行cargo build和./target/debug/grader part-b指令,得到以下结果,表示完成了P4a:

P4b
根据顶部注释,计算f_pc时使用的e_cnd依赖路径过长。因此可以将e_cnd存储于访存阶段的M.cnd存储器中。
首先,取指阶段中,将这一行的e_cnd改为M.cnd(最先发布的版本没有修改,P4b整整坑了笔者两个小时,这就是抢着做的弊端之一了)。
1
|
U8_PLACEHOLDER == JX && (!M.cnd) : U64_PLACEHOLDER;
|
取指阶段,由于条件码被存在M.cnd,因此计算f_pc时,在访存阶段中计算,即;利用刚传入访存阶段的M.icode和M.valP而非E.valP/E.icode,填写代码如下:
 1
 2
 3
 4
 5
 6
 7
 8
 9
10
11
12
13
|
u64 f_pc = [
    // Call.  Use instruction constant
    // If the previous instruction is CALL, the constant value should be the next PC
    // valC is from Fetch Stage, thus the last cycle
    D.icode == CALL : D.valC;
    // Branch misprediction.  Use incremental PC
    M.icode == JX && !M.cnd : M.valP;
    // Completion of RET instruction.  Use value from stack
    // valM is from DEMW stage, thus the current cycle
    M.icode == RET : m_valM;
    // Default: Use predicted PC
    1 : F.pred_pc;
];
|
译码阶段,由于条件码逻辑的改变与转发逻辑无关,因此与P4a中相同。
执行阶段,要决定e_dstE,因为此时还处于执行阶段,其使用的必定还是E.icode与e_cnd,因此不受新存储方式影响,与P4a中相同。
流水线寄存器控制中,由于RET冒险和加载/使用冒险不受新存储方式的影响,因此其检测方式不受影响。
在判断分支预测错误是否使用新的存储方式时,根据上文注释以及想到,由于新的存储方式只是为了解决f_pc的依赖而产生的,而对当前阶段的检测不应有影响,因此还是跟P4a中一致。
根据注释,在判断f_stall时,若发生分支预测错误,则下一个周期的f_pc一定会选择M.valP,因此无须考虑判断分支预测错误。
根据注释,在判断d_bubble时,若发生分支预测错误,因为此时位于取指阶段的指令已经不是所需的了,则直接往译码阶段注入一个气泡顶掉它,因此需要考虑有分支预测错误的情况。
根据上述原理,填写代码如下:
 1
 2
 3
 4
 5
 6
 7
 8
 9
10
11
12
13
14
15
16
17
18
19
20
21
22
23
24
25
26
27
28
29
30
31
32
33
34
35
36
37
38
39
40
41
42
43
44
|
// If a branch misprediction is detected during the Execute stage, it means that
// the instruction currently in the Decode stage is invalid. Therefore, the next
// cycle’s Execute stage needs to insert a bubble.
bool branch_mispred = E.icode == JX && !e_cnd;

// If a RET instruction is detected in either the Decode or Execute stage, then
// the instruction in the current Fetch stage is invalid. Therefore, a bubble
// needs to be inserted in the Fetch stage for the next cycle.
//
// In fact, when E.icode == RET, the instruction in the current Decode stage is
// also invalid, but because the D.icode in the previous cycle was RET, at this
// point D.icode == NOP, so there's no need to add a condition for e_bubble.
bool ret_harzard = RET in { D.icode, E.icode };

// This instruction needs to read from a register whose data was loaded from
// memory by the previous instruction, but the previous instruction is still in
// the Execute stage, causing a data hazard.
bool load_use_harzard = E.icode in { MRMOVQ, POPQ } && E.dstM in { d_srcA, d_srcB };
// an equivalent expression:
// bool load_use_harzard = E.dstM != RNONE && E.dstM in { d_srcA, d_srcB };

// Unlike in `pipe_s4a`, here we do not need to consider the case of branch
// misprediction (since in the next cycle, Fetch will always get the `f_pc`
// from `M.valP`).
bool f_stall = load_use_harzard || ret_harzard;

@set_stage(f, {
    stall: f_stall,
});


bool d_stall = load_use_harzard;

// Unlike in `pipe_s4a`, when a branch misprediction occurs, we directly insert
// a bubble, because the instruction in the Fetch stage at that point is invalid.
// Actually, ret_harzard and d_stall cannot be true at the same time.
bool d_bubble = branch_mispred || ret_harzard && !d_stall;

@set_stage(d, {
    stall: d_stall,
    bubble: d_bubble,
});

bool e_bubble = branch_mispred || load_use_harzard;
|
运行cargo build和./target/debug/grader part-b指令,得到以下结果,表示完成了P4b:

P4c
根据顶部注释,类似于pipe.std(注意,这个文件是Part C中的至关重要的一步之一,极大减少工作量),将D.valP输入到解码阶段的D.valA中,以消除执行阶段和访存阶段中的valP。
与P4b中一样,先修改取指阶段中的e_cnd为M.cnd:
1
|
U8_PLACEHOLDER == JX && (!M.cnd) : U64_PLACEHOLDER;
|
取指阶段,由于提到将valP并入到valA中,即此时计算f_pc时,应当采用M.valA而非M.valP,填写代码如下:
 1
 2
 3
 4
 5
 6
 7
 8
 9
10
11
12
13
|
u64 f_pc = [
    // Call.  Use instruction constant
    // If the previous instruction is CALL, the constant value should be the next PC
    // valC is from Fetch Stage, thus the last cycle
    D.icode == CALL : D.valC;
    // Branch misprediction.  Use incremental PC
    M.icode == JX && !M.cnd : M.valA;
    // Completion of RET instruction.  Use value from stack
    // valM is from DEMW stage, thus the current cycle
    M.icode == RET : m_valM;
    // Default: Use predicted PC
    1 : F.pred_pc;
];
|
取指阶段,d_valA的更新增加了合并D.valP逻辑,但是需要填写的仍为转发逻辑,与其无关,因此与P4b中相同。
执行阶段,CMOVXX的判断逻辑,不受合并影响,因此与P4b中相同。
访存阶段,由于合并了原有的Call指令需要的M.valP到M.valA中,因此mem_data,即需要写入内存中的数据,只是M.valA,填写代码如下:
1
2
|
// We've feed D.valP into d_valA. Thus M.valP is not needed.
u64 mem_data = U64_PLACEHOLDER;
|
流水线寄存器控制逻辑上,其不受合并逻辑影响,因此与P4b中相同。
运行cargo build和./target/debug/grader part-b指令,得到以下结果,表示完成了P4b/Part b:
Part C
根据writeup,Part C完全基于性能得分,若ncopy.ys或ncopy.rs未通过正确性测试,将不得分。
首先介绍两个概念,CPE和Arch Cost。
CPE:即每元素周期数,若模拟代码复制 $N$ 个元素需要 $C$ 个周期,则 $CPE=\frac{C}{N}$ 。
Arch Cost:ncopy架构的关键路径长度。形式上,CPU架构的关键路径是时钟元件之间组合逻辑的最长路径。关键路径的长度可以用来衡量CPU的的时钟频率,从而用于估算架构性能。在Part C中,关键路径的长度简化为:1加上在架构路径中排列的硬件设备(单元)的最大数量。
定义 $c=cpe+2 \times ac$ ,则得分 $S$ 计算如下:
$$
S=\begin{cases}
0, c>19.0 \\
19 \times (19.0-c) 16.0< c \leq 19.0 \\
57, 15.0<c \leq 16.0 \\
60, c \leq 15.0 \\
\end{cases}
$$
阅读源码
观察源码ncopy.c,得出其功能
 1
 2
 3
 4
 5
 6
 7
 8
 9
10
11
12
13
|
word_t ncopy(word_t *src, word_t *dst, word_t len) {
  word_t count = 0;
  word_t val;

  while (len > 0) {
    val = *src++;
    *dst++ = val;
    if (val > 0)
      count++;
    len--;
  }
  return count;
}
|
可以看出,其功能是将src处的元素复制到dst,并计算其中的正数个数。注意,对于最终测试,将会对所有大小的数组进行测试。
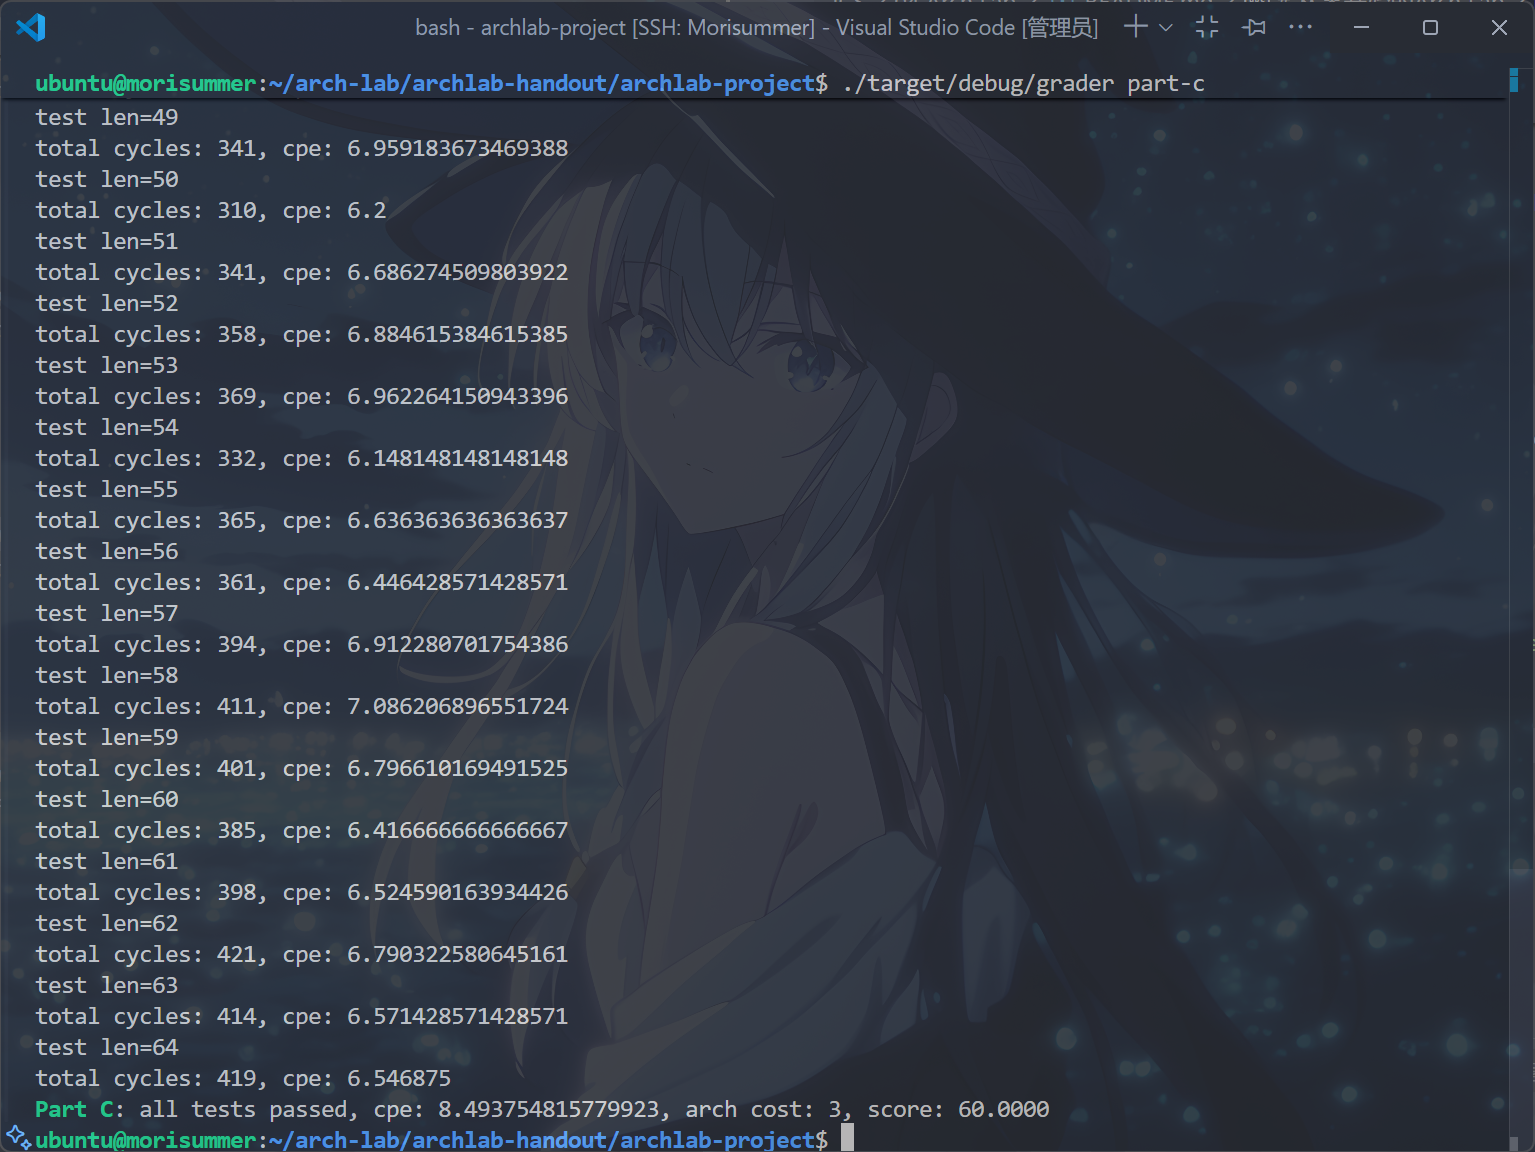
运行cargo build和./target/debug/grader part-c指令,得到以下输出,这表明了默认ncopy.rs和ncopy.ys的性能:
实在是差得离谱,根据上面的分数计算公式,如果将AC优化到3,那么只需要CPE小于等于9。而如果AC优化到4,那么CPE需要小于等于7,后者是一个很困难的任务!不推荐同学们尝试,真正做到的人数极少,且需要耗费大量时间精力,在期中周之前实在不值。
优化Arch Cost
更换基础架构
根据writeup,有如下描述(已翻译):
Part C中,默认的HCL描述文件ncopy.rs是seq_std.rs的副本。你可将其替换为其他流水线架构,再进行针对性修改。
archlab-project/sim/src/architectures/extra目录下除mod.rs外的所有Rust源文件均被视为 CPU架构。
看完这两句,注意到writeup中定义Arch Cost有如下语句:
例如,seq_std的关键路径长度为8,pipe_std的关键路径长度为4。
很容易产生联想,只要照搬pipe_std,就能直接把Arch Cost优化到4,岂不美哉?而且,这个文件名是std诶,细看还是五级流水线,信手拈来啊。
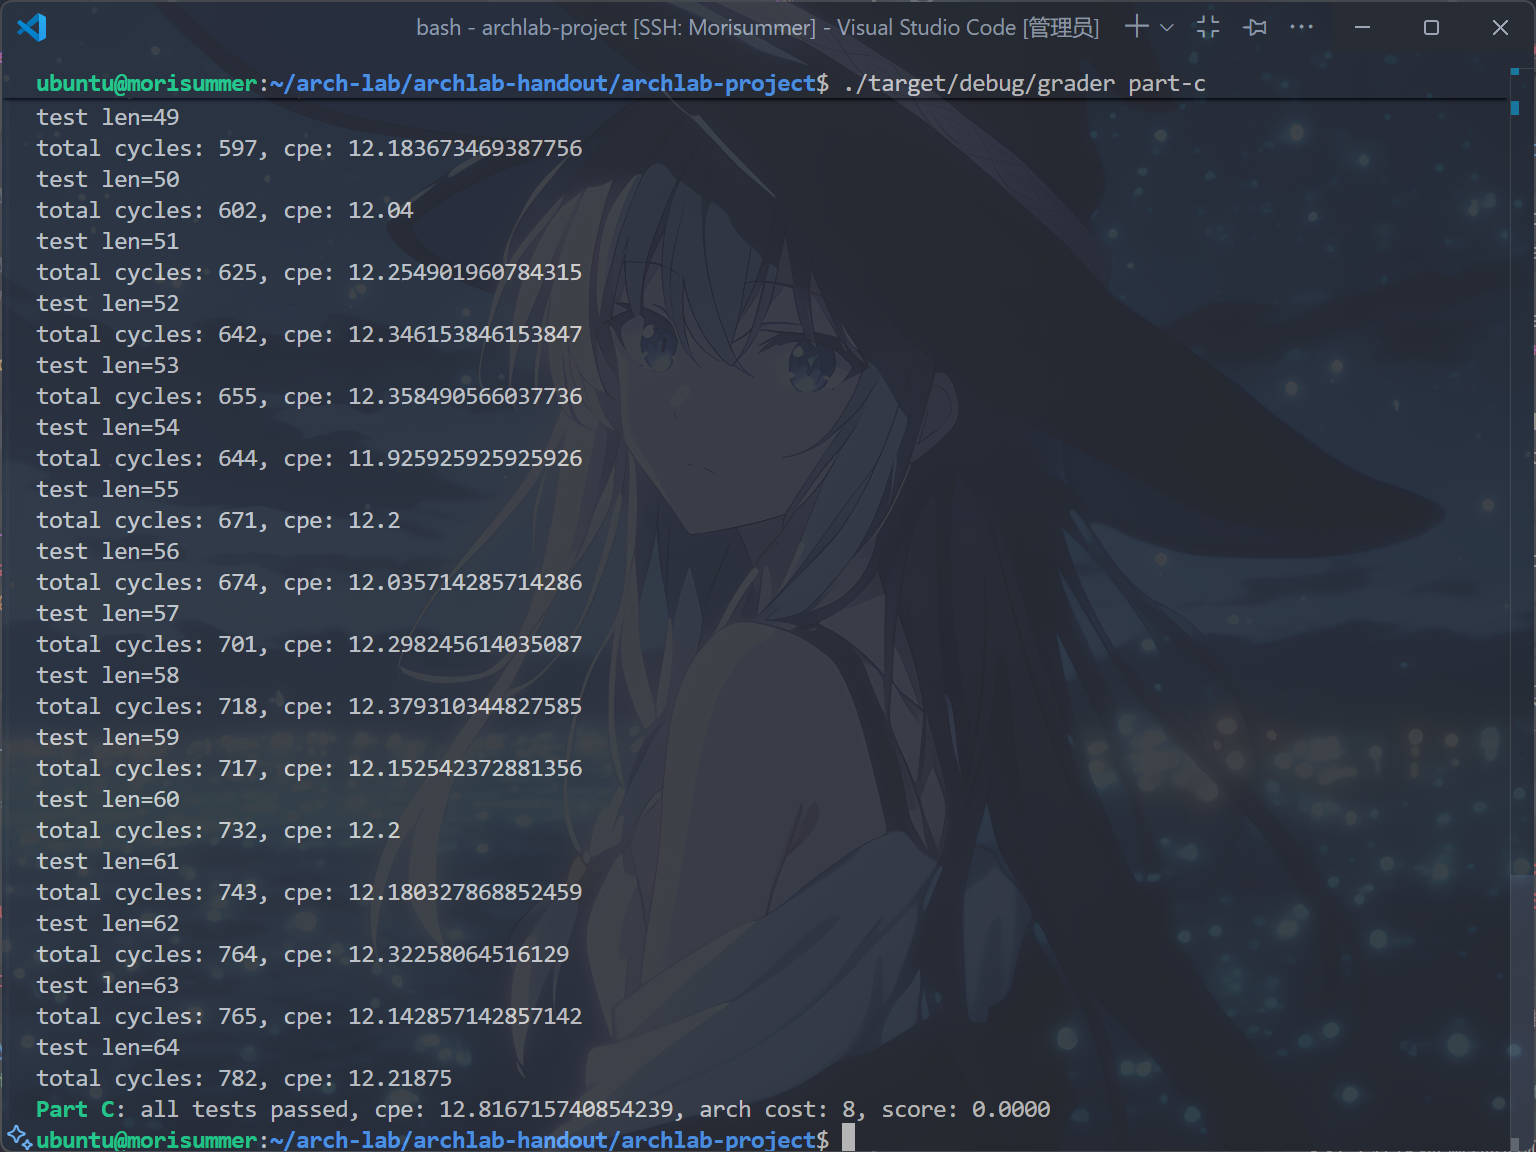
将pipe_std复制到ncopy.rs中,运行cargo build和./target/debug/grader part-c,得到以下结果:
真的把Arch Cost优化到4了,哦耶!
但是……还不够,要找出把Arch Cost优化到3的方法!
笔者注:亦可使用Part B中完成的pipe_s4c文件作为初始架构,其Arch Cost亦为4,但优化到3难度较高,需要手动添加写回阶段。
增加IOPQ
结合在Part B实现的IOPQ逻辑,是否可以使用它优化Y86代码呢?
答案是肯定的,irmovq $8, %rdi addq %rdi, %rsi对比iaddq $8, %rsi,既省寄存器又简单,势必能优化程序性能。
仿照Part B中的逻辑,在ncopy.rs中加上以下逻辑:
 1
 2
 3
 4
 5
 6
 7
 8
 9
10
11
12
13
14
15
16
17
18
19
20
21
22
23
24
25
26
27
28
29
30
31
32
33
34
35
36
37
38
39
40
41
42
43
44
45
46
47
48
49
50
51
52
|
// Is instruction valid?
bool instr_valid = f_icode in { NOP, HALT, CMOVX, IRMOVQ, RMMOVQ,
    MRMOVQ, OPQ, JX, CALL, RET, PUSHQ, POPQ, IOPQ };

// Does fetched instruction require a regid byte?
bool need_regids
    = f_icode in { CMOVX, OPQ, PUSHQ, POPQ, IRMOVQ, RMMOVQ, MRMOVQ, IOPQ };

// Does fetched instruction require a constant word?
bool need_valC = f_icode in { IRMOVQ, RMMOVQ, MRMOVQ, JX, CALL, IOPQ };

// What register should be used as the B source?
u8 d_srcB = [
    D.icode in { OPQ, RMMOVQ, MRMOVQ, IOPQ } : D.rB;
    D.icode in { PUSHQ, POPQ, CALL, RET } : RSP;
    1 : RNONE; // Don't need register
];

// What register should be used as the E destination?
u8 d_dstE = [
    D.icode in { CMOVX, IRMOVQ, OPQ, IOPQ } : D.rB;
    D.icode in { PUSHQ, POPQ, CALL, RET } : RSP;
    1 : RNONE; // Don't write any register
];


// Select input A to ALU
u64 aluA = [
    E.icode in { CMOVX, OPQ } : E.valA;
    E.icode in { IRMOVQ, RMMOVQ, MRMOVQ, IOPQ } : E.valC;
    E.icode in { CALL, PUSHQ } : NEG_8;
    E.icode in { RET, POPQ } : 8;
    1 : 0; // Other instructions don't need ALU
];

// Select input B to ALU
u64 aluB = [
    E.icode in { RMMOVQ, MRMOVQ, OPQ, CALL, PUSHQ, RET, POPQ, IOPQ } : E.valB;
    E.icode in { CMOVX, IRMOVQ } : 0;
    1 : 0; // Other instructions don't need ALU
];

// Set the ALU function
u8 alufun = [
    E.icode in { OPQ, IOPQ } : E.ifun;
    1 : ADD;
];

// Should the condition codes be updated?
bool set_cc = E.icode in { OPQ, IOPQ } &&
    // State changes only during normal operation
    !(m_stat in { Adr, Ins, Hlt }) && !(W.stat in { Adr, Ins, Hlt });
|
加上该逻辑后,无从验证是否提高了CPE,因为甚至还没开始编写自己的ncopy.ys代码呢!既然没有使用之处就暂时没有办法测试。
修改条件码逻辑
首先,运行cargo build和cargo run --bin ysim -- -A ncopy -I指令,得到以下结果:
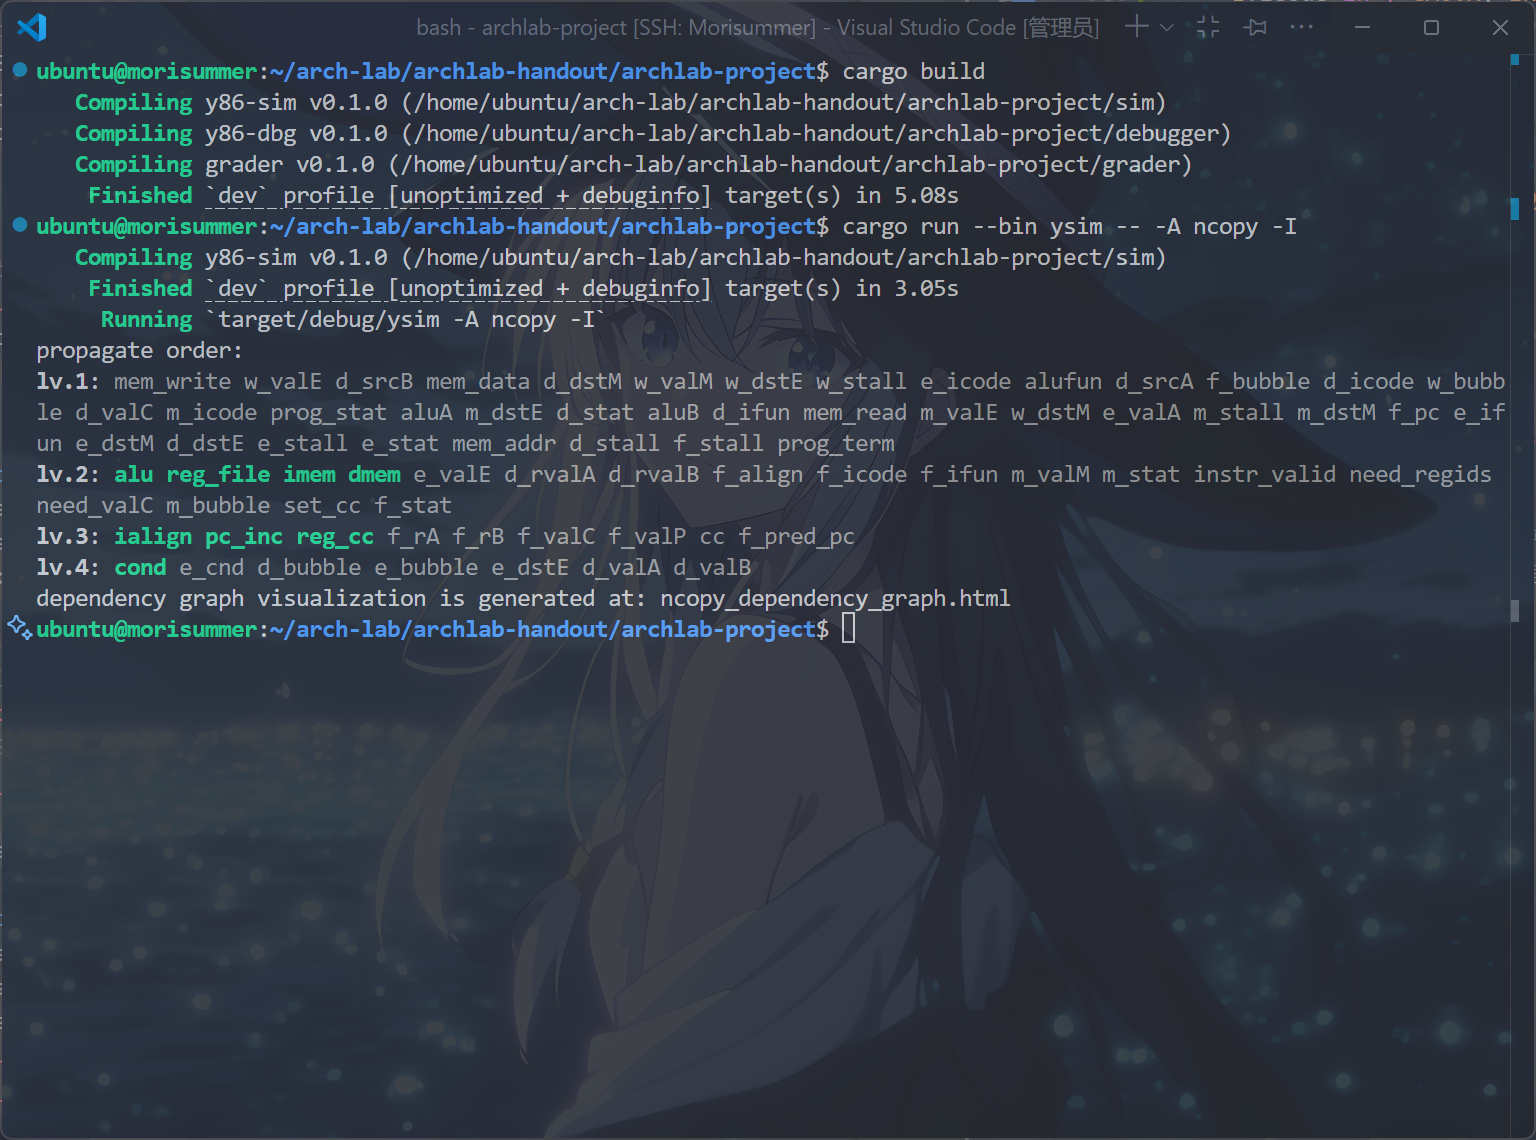
这就是现在ncopy.rs的关键路径,观察这条lv.4的路径,发现它一共有以上部分组成。
打开程序附带生成的ncopy_dependency_graph.html文件,发现以下路径为关键路径:
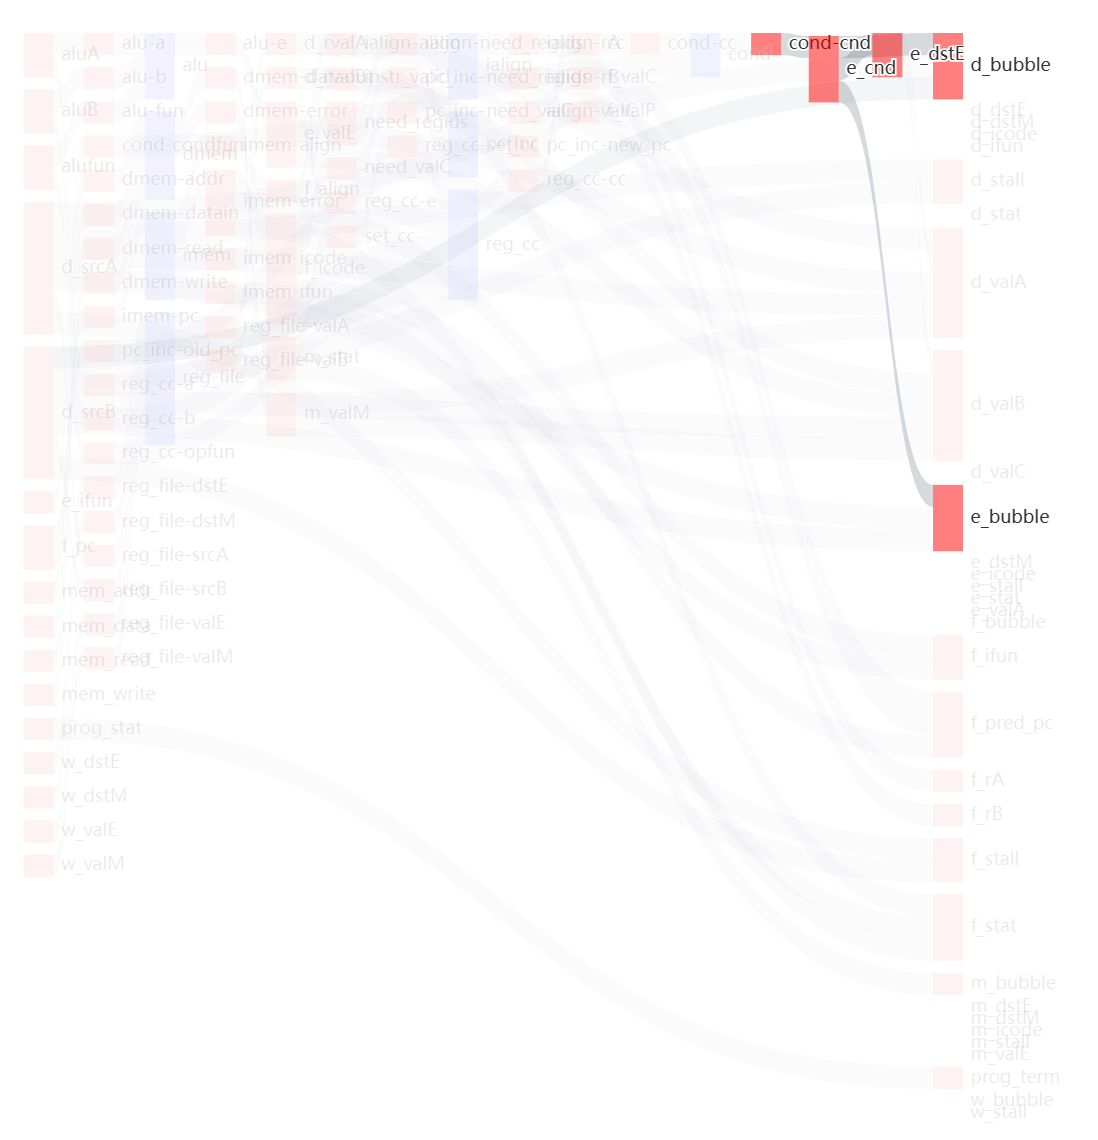
也就是,cond-cnd、e_cnd、e_dstE、d_bubble构成了一条导致Arch Cost为4的关键路径。
首先考虑,怎么将这条路径断开?
一点小巧思,注意到,修改cond_cnd的,只有OPQ和IOPQ指令,而需要它们计算出e_cnd作为判断依据的,只有JXX和CMOVXX。换句话说,没有一条指令同时修改条件码,又需要条件码进行计算的。
一个显然的思路是,将上一条周期的条件码存在执行阶段的流水线寄存器中,用于通过cond单元计算出e_cnd。
然后,对于一个rust小白来说,这样的事情还是有些困难,此时利用LLM即可以完成以下任务:
在define_stages中,为执行阶段新声明一个条件码类型的变量pre_cc,得到代码如下:
1
2
3
4
5
6
7
8
|
    ExecuteStage e {
        stat: Stat = Bub, icode: u8 = NOP, ifun: u8 = 0,
        valC: u64 = 0,
        valA: u64 = 0, valB: u64 = 0,
        dstE: u8 = RNONE, dstM: u8 = RNONE,
        srcA: u8 = RNONE, srcB: u8 = RNONE,
        pre_cc: ConditionCode = CC_INIT // name the pre_cc
    }
|
其次,在译码阶段传递到执行阶段的类定义中,将当前条件码cc传给执行阶段的pre_cc:
 1
 2
 3
 4
 5
 6
 7
 8
 9
10
11
12
13
|
@set_stage(e, {
    icode: d_icode,
    ifun: d_ifun,
    stat: d_stat,
    valC: d_valC,
    srcA: d_srcA,
    srcB: d_srcB,
    valA: d_valA,
    valB: d_valB,
    dstE: d_dstE,
    dstM: d_dstM,
    pre_cc: cc, // promote the pre_cc in Execute stage
});
|
最后,在执行阶段中,提取出pre_cc作为cond单元中e_cnd的计算依据:
1
2
3
4
5
6
7
|
ConditionCode pre_cc = E.pre_cc; // accept the pre_cc
ConditionCode cc = reg_cc.cc;

@set_input(cond, {
    cc: pre_cc,
    condfun: e_ifun,
});
|
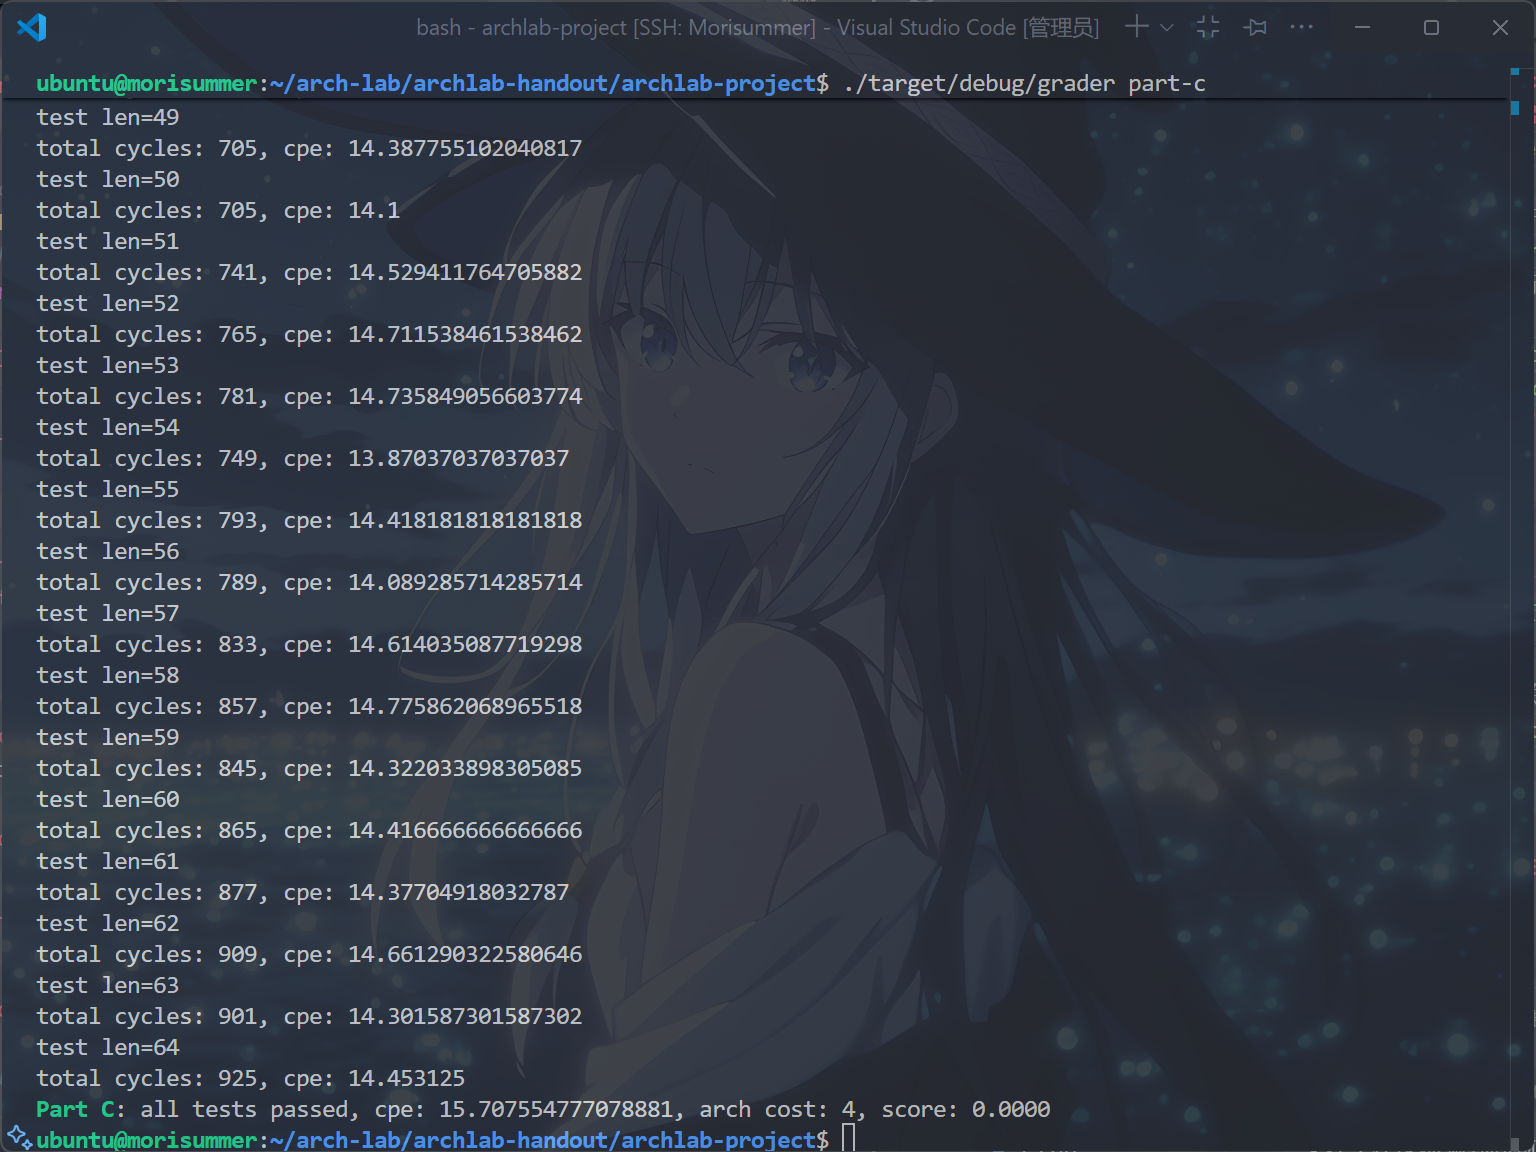
运行cargo build和./target/debug/grader part-c指令,得到以下结果:

真的成功将Arch Cost优化到了3!已经度过最难的一关了!
优化CPE/循环展开
此处笔者要声明的是,在将Arch Cost优化到3后,即使是朴素的 $4 \times 1$ 路展开也能通过,在此,笔者介绍自己的十路展开做法,以供参考。
为什么是十路展开?其实是笔者青睐这个数字,因为Y86架构共有15个寄存器,而%rdi,%rsi,%rdx被用作传入的参数,%rax被用作返回值,%rsp被用作栈寄存器,因此还剩10个空闲寄存器可以用来存储临时变量。
根据何为循环展开?中提供的思路,可以写出循环体如下:
 1
 2
 3
 4
 5
 6
 7
 8
 9
10
11
12
13
14
15
16
17
18
19
20
21
22
23
24
25
|
	iaddq $-10, %rdx # compute len minus 10,if less than 10, then jump to stage that deals with remainder.
	jl Less

Loop:
	mrmovq (%rdi), %r8
	mrmovq 8(%rdi), %r9
	mrmovq 16(%rdi), %r10
	mrmovq 24(%rdi), %r11
	mrmovq 32(%rdi), %r12
	mrmovq 40(%rdi), %r13
	mrmovq 48(%rdi), %r14
	mrmovq 56(%rdi), %rcx
	mrmovq 64(%rdi), %rbx
	mrmovq 72(%rdi), %rbp
	rmmovq %r8, (%rsi)
	rmmovq %r9, 8(%rsi)
	rmmovq %r10, 16(%rsi)
	rmmovq %r11, 24(%rsi)
	rmmovq %r12, 32(%rsi)
	rmmovq %r13, 40(%rsi)
	rmmovq %r14, 48(%rsi)
	rmmovq %rcx, 56(%rsi)
	rmmovq %rbx, 64(%rsi)
	rmmovq %rbp, 72(%rsi) # tenfold
	jmp PD8
|
再加上逐个判断是否为正数的部分和跳转到下一个循环的部分,如下:
 1
 2
 3
 4
 5
 6
 7
 8
 9
10
11
12
13
14
15
16
17
18
19
20
21
22
23
24
25
26
27
28
29
30
31
32
33
34
35
36
37
38
39
40
41
42
43
44
45
46
47
48
49
50
51
52
53
54
55
|
PD8:
	andq %r8,%r8
	jle PD9
	iaddq $1, %rax # if the first one is positive.

PD9:
	andq %r9,%r9
	jle PD10
	iaddq $1, %rax # if the second one is positive.

PD10:
	andq %r10,%r10
	jle PD11
	iaddq $1, %rax # if the third one is positive.

PD11:
	andq %r11,%r11
	jle PD12
	iaddq $1, %rax # if the fourth one is positive.

PD12:
	andq %r12,%r12
	jle PD13
	iaddq $1, %rax # if the fifth one is positive.

PD13:
	andq %r13,%r13
	jle PD14
	iaddq $1, %rax # if the sixth one is positive.

PD14:
	andq %r14,%r14
	jle PDCX
	iaddq $1, %rax # if the seventh one is positive.

PDCX:
	andq %rcx,%rcx
	jle PDBX
	iaddq $1, %rax # if the eighth one is positive.

PDBX:
	andq %rbx,%rbx
	jle PDBP
	iaddq $1, %rax # if the ninth one is positive.

PDBP:
	andq %rbp, %rbp
	jle RECOVER
	iaddq $1, %rax # if the tenth one is positive.

RECOVER:
	iaddq $80, %rdi
	iaddq $80, %rsi
	isubq $10, %rdx # forward the stage
	jge Loop # back to loop
|
开头的jl Less语句,也就是当剩余长度小于10时,跳转到余数处理部分。
余数处理/二分跳转表
众所周知,在Y86中,是没有跳转表的,需要手动实现。
那么,联想计概/程设/数算中学的二分方法,在二分答案的时候,总是将一个区间分为两个小区间(或者再加一个值),而这可以通过Y86中的jl/je/jg语句实现,从而达到该效果,大幅降低时间复杂度。
在笔者的代码中,首先判断是否余数为0,若是则跳转到返回部分,然后将1~9分为[1,3]、4、[5,9]三个区间,由于三个语句的特性,[1,3]可以一次分开,而[5,9]还需要分为[5,6]和[7,9]两个区间进一步区分,达到能够让每个元素在最多三次之内跳转到所属位置。
根据以上思路,写出代码如下:
 1
 2
 3
 4
 5
 6
 7
 8
 9
10
11
12
13
14
15
16
17
18
19
20
|
Less:
	iaddq $10, %rdx
	jle Done # if less than 0, then return.
	isubq $4, %rdx # sort it into 1-3 and 4-9.
	jge Sort4
	iaddq $2, %rdx # sort it to 1,2,and 3.
	jl Back1
	je Back2
	jmp Back3

Sort4:
	je Back4 # if it is equal to 4,then jmp.
	isubq $2, %rdx # sort it to 5-6,and 7-9
	jl Back5
	je Back6

	isubq $2, %rdx # sort it to 7,8, and 9.
	jl Back7
	je Back8
	jmp Back9
|
然后,在Part A中,也许会注意到,Y86的函数之间也有Fall Through的特性,因此考虑倒序处理,让较大的余数被处理后Fall through到较小的余数处理部分。
编写这部分代码如下:
 1
 2
 3
 4
 5
 6
 7
 8
 9
10
11
12
13
14
15
16
17
18
19
20
21
22
23
24
25
26
27
28
29
30
31
32
33
34
35
36
37
38
39
40
41
42
43
44
45
46
47
48
49
50
51
52
53
54
55
56
57
58
59
60
61
62
63
64
65
|
Back9:
	mrmovq 64(%rdi), %r8
	rmmovq %r8, 64(%rsi)
	andq %r8, %r8
	jle Back8 # fall through
	iaddq $1, %rax # if the ninth one is positive.

Back8:
	mrmovq 56(%rdi), %r9
	rmmovq %r9, 56(%rsi)
	andq %r9, %r9
	jle Back7 # fall through
	iaddq $1, %rax # if the eighth one is positive.

Back7:
	mrmovq 48(%rdi), %r10
	rmmovq %r10, 48(%rsi)
	andq %r10, %r10
	jle Back6 # fall through
	iaddq $1, %rax # if the seventh one is positive.

Back6:
	mrmovq 40(%rdi), %r11
	rmmovq %r11, 40(%rsi)
	andq %r11, %r11
	jle Back5 # fall through
	iaddq $1, %rax # if the sixth one is positive.

Back5:
	mrmovq 32(%rdi), %r12
	rmmovq %r12, 32(%rsi)
	andq %r12, %r12
	jle Back4 # fall through
	iaddq $1, %rax # if the fifth one is positive.

Back4:
	mrmovq 24(%rdi), %r13
	rmmovq %r13, 24(%rsi)
	andq %r13, %r13
	jle Back3 # fall through
	iaddq $1, %rax # if the fourth one is positive.

Back3:
	mrmovq 16(%rdi),%r14
	rmmovq %r14, 16(%rsi)
	andq %r14, %r14
	jle Back2 # fall through
	iaddq $1, %rax # if the third one is postive.

Back2:
	mrmovq 8(%rdi), %rcx
	rmmovq %rcx, 8(%rsi)
	andq %rcx, %rcx
	jle Back1 # fall through
	iaddq $1, %rax # if the second one is positive.

Back1:
	mrmovq (%rdi), %rbx
	rmmovq %rbx, (%rsi)
	andq %rbx, %rbx
	jle Done # fall through and return
	iaddq $1, %rax # if the first one is positive.

Done:
	ret
|
汇总以上代码,得出ncopy.ys的完整代码如下(注意只需要写循环体内容,无须像Part A一样写出栈定义等等):
  1
  2
  3
  4
  5
  6
  7
  8
  9
 10
 11
 12
 13
 14
 15
 16
 17
 18
 19
 20
 21
 22
 23
 24
 25
 26
 27
 28
 29
 30
 31
 32
 33
 34
 35
 36
 37
 38
 39
 40
 41
 42
 43
 44
 45
 46
 47
 48
 49
 50
 51
 52
 53
 54
 55
 56
 57
 58
 59
 60
 61
 62
 63
 64
 65
 66
 67
 68
 69
 70
 71
 72
 73
 74
 75
 76
 77
 78
 79
 80
 81
 82
 83
 84
 85
 86
 87
 88
 89
 90
 91
 92
 93
 94
 95
 96
 97
 98
 99
100
101
102
103
104
105
106
107
108
109
110
111
112
113
114
115
116
117
118
119
120
121
122
123
124
125
126
127
128
129
130
131
132
133
134
135
136
137
138
139
140
141
142
143
144
145
146
147
148
149
150
151
152
153
154
155
156
157
158
159
160
161
162
163
164
165
166
167
168
169
170
171
172
|
ncopy:
################################################################################
# You can modify this portion
	# Loop header
	iaddq $-10, %rdx # compute len minus 10,if less than 10, then jump to stage that deals with remainder.
	jl Less

Loop:
	mrmovq (%rdi), %r8
	mrmovq 8(%rdi), %r9
	mrmovq 16(%rdi), %r10
	mrmovq 24(%rdi), %r11
	mrmovq 32(%rdi), %r12
	mrmovq 40(%rdi), %r13
	mrmovq 48(%rdi), %r14
	mrmovq 56(%rdi), %rcx
	mrmovq 64(%rdi), %rbx
	mrmovq 72(%rdi), %rbp
	rmmovq %r8, (%rsi)
	rmmovq %r9, 8(%rsi)
	rmmovq %r10, 16(%rsi)
	rmmovq %r11, 24(%rsi)
	rmmovq %r12, 32(%rsi)
	rmmovq %r13, 40(%rsi)
	rmmovq %r14, 48(%rsi)
	rmmovq %rcx, 56(%rsi)
	rmmovq %rbx, 64(%rsi)
	rmmovq %rbp, 72(%rsi) # tenfold
	jmp PD8

PD8:
	andq %r8,%r8
	jle PD9
	iaddq $1, %rax # if the first one is positive.

PD9:
	andq %r9,%r9
	jle PD10
	iaddq $1, %rax # if the second one is positive.

PD10:
	andq %r10,%r10
	jle PD11
	iaddq $1, %rax # if the third one is positive.

PD11:
	andq %r11,%r11
	jle PD12
	iaddq $1, %rax # if the fourth one is positive.

PD12:
	andq %r12,%r12
	jle PD13
	iaddq $1, %rax # if the fifth one is positive.

PD13:
	andq %r13,%r13
	jle PD14
	iaddq $1, %rax # if the sixth one is positive.

PD14:
	andq %r14,%r14
	jle PDCX
	iaddq $1, %rax # if the seventh one is positive.

PDCX:
	andq %rcx,%rcx
	jle PDBX
	iaddq $1, %rax # if the eighth one is positive.

PDBX:
	andq %rbx,%rbx
	jle PDBP
	iaddq $1, %rax # if the ninth one is positive.

PDBP:
	andq %rbp, %rbp
	jle RECOVER
	iaddq $1, %rax # if the tenth one is positive.

RECOVER:
	iaddq $80, %rdi
	iaddq $80, %rsi
	isubq $10, %rdx # forward the stage
	jge Loop # back to loop

Less:
	iaddq $10, %rdx
	jle Done # if less than 0, then return.
	isubq $4, %rdx # sort it into 1-3 and 4-9.
	jge Sort4
	iaddq $2, %rdx # sort it to 1,2,and 3.
	jl Back1
	je Back2
	jmp Back3

Sort4:
	je Back4 # if it is equal to 4,then jmp.
	isubq $2, %rdx # sort it to 5-6,and 7-9
	jl Back5
	je Back6

	isubq $2, %rdx # sort it to 7,8, and 9.
	jl Back7
	je Back8
	jmp Back9

Back9:
	mrmovq 64(%rdi), %r8
	rmmovq %r8, 64(%rsi)
	andq %r8, %r8
	jle Back8 # fall through
	iaddq $1, %rax # if the ninth one is positive.

Back8:
	mrmovq 56(%rdi), %r9
	rmmovq %r9, 56(%rsi)
	andq %r9, %r9
	jle Back7 # fall through
	iaddq $1, %rax # if the eighth one is positive.

Back7:
	mrmovq 48(%rdi), %r10
	rmmovq %r10, 48(%rsi)
	andq %r10, %r10
	jle Back6 # fall through
	iaddq $1, %rax # if the seventh one is positive.

Back6:
	mrmovq 40(%rdi), %r11
	rmmovq %r11, 40(%rsi)
	andq %r11, %r11
	jle Back5 # fall through
	iaddq $1, %rax # if the sixth one is positive.

Back5:
	mrmovq 32(%rdi), %r12
	rmmovq %r12, 32(%rsi)
	andq %r12, %r12
	jle Back4 # fall through
	iaddq $1, %rax # if the fifth one is positive.

Back4:
	mrmovq 24(%rdi), %r13
	rmmovq %r13, 24(%rsi)
	andq %r13, %r13
	jle Back3 # fall through
	iaddq $1, %rax # if the fourth one is positive.

Back3:
	mrmovq 16(%rdi),%r14
	rmmovq %r14, 16(%rsi)
	andq %r14, %r14
	jle Back2 # fall through
	iaddq $1, %rax # if the third one is postive.

Back2:
	mrmovq 8(%rdi), %rcx
	rmmovq %rcx, 8(%rsi)
	andq %rcx, %rcx
	jle Back1 # fall through
	iaddq $1, %rax # if the second one is positive.

Back1:
	mrmovq (%rdi), %rbx
	rmmovq %rbx, (%rsi)
	andq %rbx, %rbx
	jle Done # fall through and return
	iaddq $1, %rax # if the first one is positive.

Done:
	ret
|
运行cargo build和./target/debug/grader patr-c指令,得到以下结果,表示完成了Part C:
当然,进一步优化,还有戳气泡(见下方参考资料)以及打表等方法(打表不建议使用),但是已经拿到满分了,就不想卷了。
运行make handin指令,生成archlab-handin.tar压缩包,上传到AutoLab即可,不要忘了在该写的地方写上代码注释~
于是,完成了ICS的第四个Lab,Congratulations!
参考资料
Arthals-更适合北大宝宝体质的Arch Lab踩坑记