Python 与 C++
模型结构、训练循环和实验配置经常变化,使用 Python 编写更方便。卷积、矩阵乘法等算子执行次数多、性能要求高,通常由 C++ 或 CUDA 实现。
一次 Python 调用自定义 CUDA 算子时,数据会经过几层边界。
- Python 接收 Tensor 并调用扩展模块。
- PyBind 把 Python 对象转换为 C++ 能使用的对象。
- C++ 入口检查 shape、dtype、device 与 layout。
- CUDA 代码在当前设备和 stream 上启动 kernel。
- C++ 返回一个由 PyTorch 管理内存的 Tensor。
PyBind11 只处理语言绑定,不会自动把 Python 代码变快。若每个元素都跨一次语言边界,调用开销会非常明显。通常把一个完整算子放入 C++,一次传入整块数组或 Tensor。
PyBind11
PyBind11 是 header-only C++ 库。PYBIND11_MODULE 定义 Python import 时加载的模块,module.def 把 C++ 函数登记为 Python 属性。
第一个模块
| |
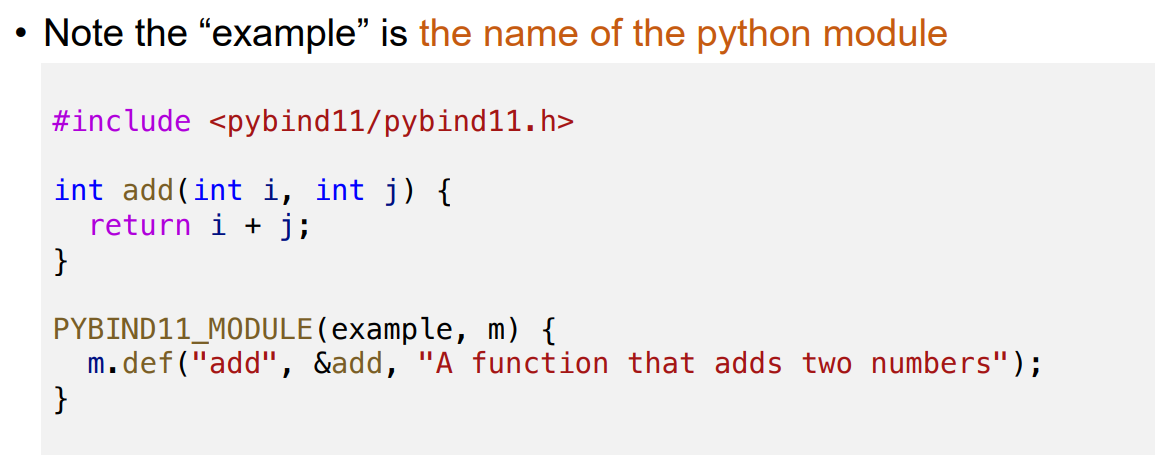
编译后得到 Python 可以动态加载的 shared library。文件后缀包含当前 Python 的 ABI 信息。模块名 example 必须与生成扩展的名称一致,否则 import 时找不到初始化符号。
最小 CMake 配置为
| |
构建并测试模块。
| |
扩展所在目录需要位于 sys.path。开发阶段也可以使用 pip install -e . 把包以 editable mode 安装到当前环境,避免每次手动修改搜索路径。
参数转换
整数、浮点数、字符串和常见 STL 容器可以由 PyBind11 自动转换。自动转换很方便,也可能隐式复制数据。
| |
Python list 传入 std::vector<int> 时,会创建一份 C++ vector。函数内部修改这份 vector 不会原地修改原 Python list。大数组应使用 buffer protocol、NumPy 或 Tensor 接口,避免逐元素转换。
绑定类
| |
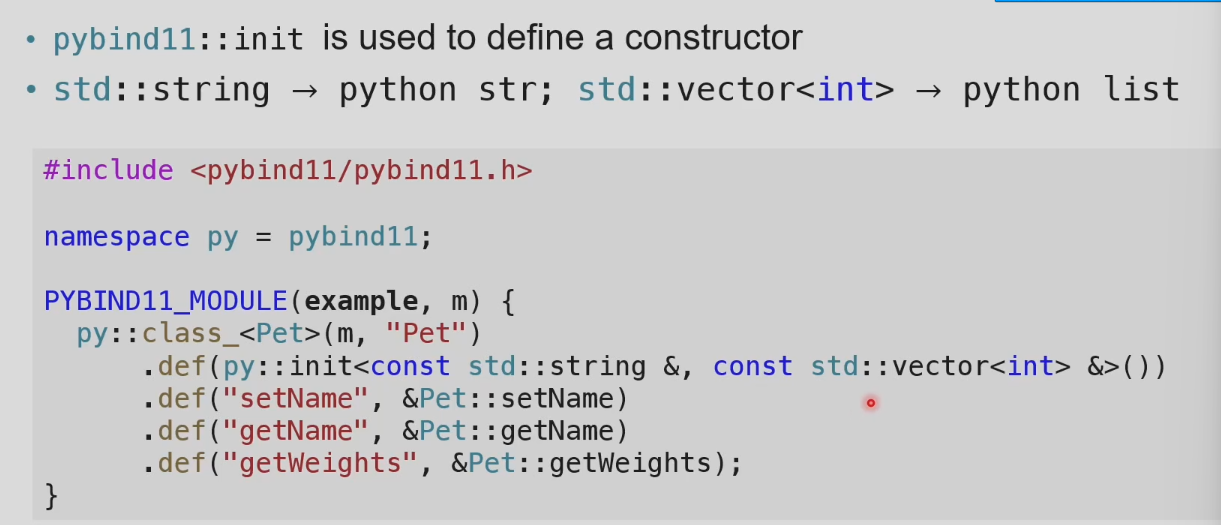
Python 对象销毁时,PyBind11 会根据 holder 释放 C++ 对象。默认 holder 通常是 std::unique_ptr。需要共享所有权时,可以在 py::class_ 中指定 std::shared_ptr<Counter>。
返回 C++ 内部成员的指针或引用时,必须保证父对象仍然存活。py::return_value_policy::reference_internal 可以把返回对象的生命期绑定到父对象,但更稳妥的接口通常直接返回值,或者让所有权在类型设计中清楚表达。
NumPy 与 GIL
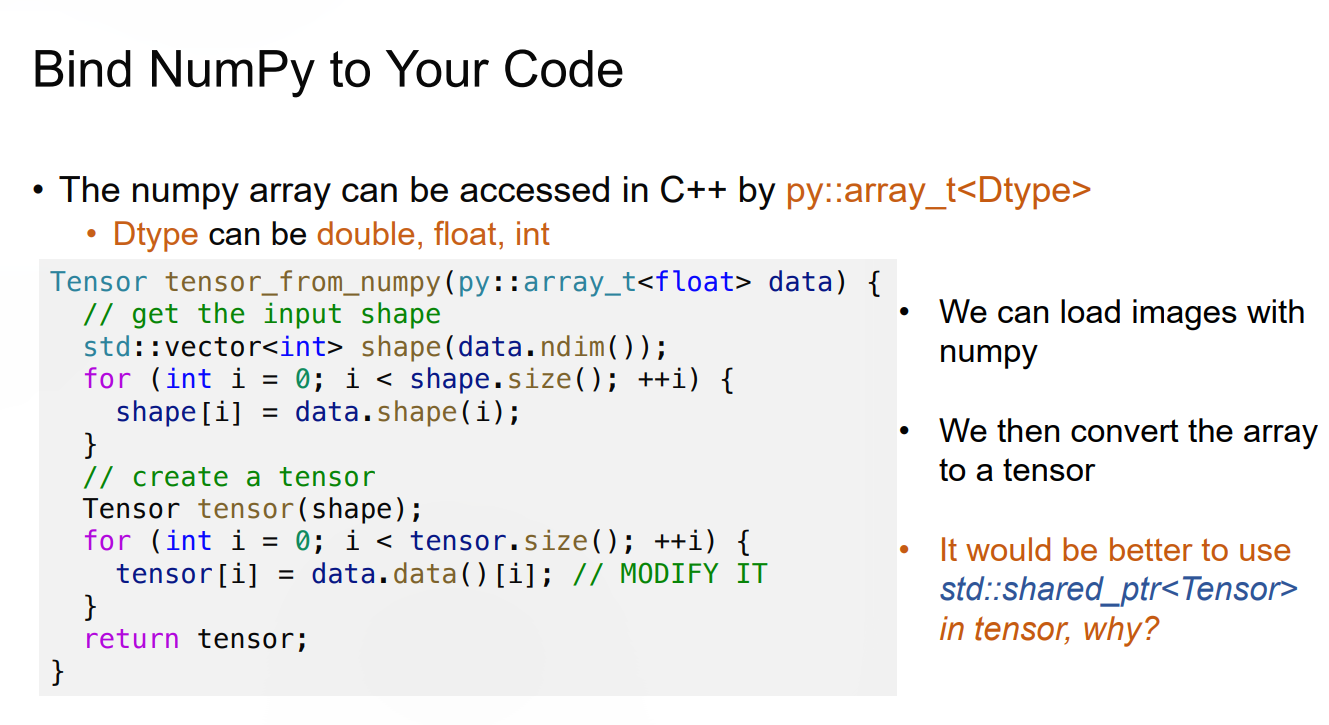
py::array_t<T> 通过 NumPy 的 buffer protocol 暴露 data pointer、shape、stride 与 dtype。C++ 可以直接读取 NumPy 内存,不必先转换成 std::vector。
| |
c_style 要求数组按 C 顺序连续,forcecast 允许 PyBind11 在 dtype 或布局不匹配时创建临时副本。这个接口保证 C++ 端可以线性读取,但调用者未必得到零拷贝。
若接口接受任意布局,就要按 info.shape 与 info.strides 寻址。NumPy stride 的单位是 byte,不是元素个数。转置数组看起来仍是二维矩阵,底层地址却可能跨步。
C++ 返回的 NumPy array 若引用外部内存,外部内存不能在 Python array 之前释放。可以用 capsule 保存析构函数,也可以把拥有内存的 Python 对象作为 base。把局部 std::vector 的 data() 直接返回会留下悬空指针。
Global Interpreter Lock 保证同一 Python 解释器中只有一个线程执行 Python bytecode。长时间运行且完全不调用 Python API 的 C++ 计算可以暂时释放 GIL。
| |
释放 GIL 后,其他 Python 线程可以运行。C++ 代码若需要创建 Python 对象、抛出依赖 Python 状态的异常或调用回调,必须重新获取 GIL。
扩展模块
PyTorch C++ Extension 把 PyBind11、ATen Tensor API、C++ 编译器和 NVCC 接在同一构建流程中。一个小型算子通常分成三层。
| |
绑定文件只暴露稳定入口。
| |
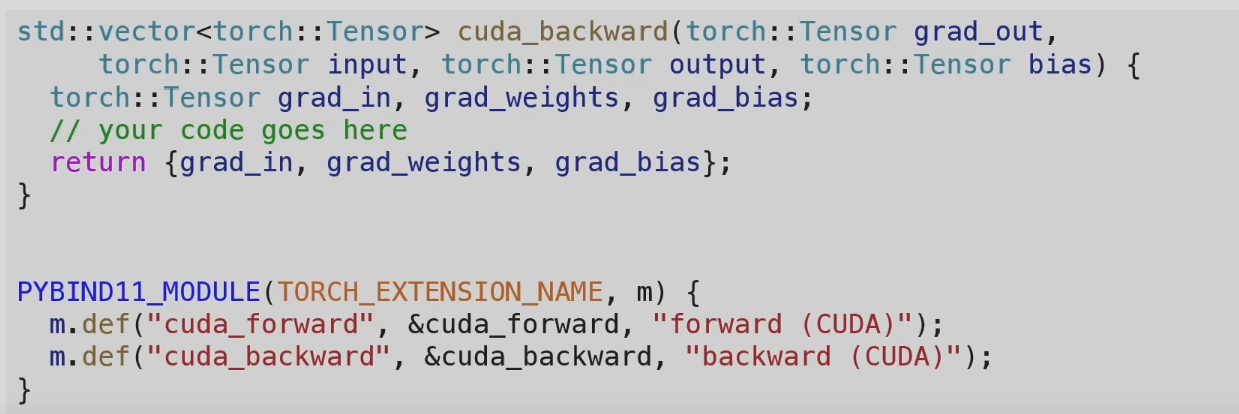
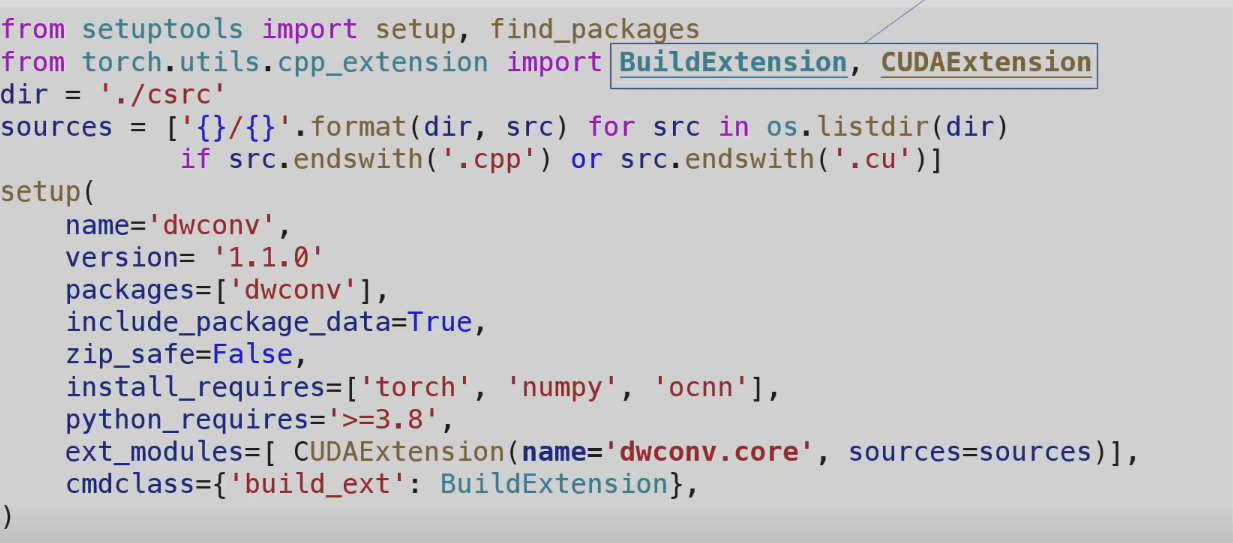
TORCH_EXTENSION_NAME 由构建系统传入,使初始化符号与最终模块名保持一致。Python 侧可以使用 CUDAExtension 同时编译 .cpp 与 .cu 文件。
| |
Tensor 检查
Python 允许调用者传入各种 Tensor,kernel 却常只实现一种 dtype、device 与 layout。入口处应在取 data pointer 前检查约束。
| |
还要检查维度、空 Tensor 和 shape 关系。输出应使用 torch::empty、empty_like 等 ATen API 分配,让 Tensor 自己管理显存。不要在返回前释放输出指针,也不要把临时 host memory 包装成 CUDA Tensor。
多 GPU 程序中,kernel 要在输入所在 device 上启动。异步执行还要使用 PyTorch 当前 CUDA stream,不能偷偷切回默认 stream,否则上游算子与自定义 kernel 之间的依赖可能失效。
Autograd
只绑定 forward 并不会自动产生 backward。可以先在 Python 中继承 torch.autograd.Function,显式连接两段扩展代码。
| |
ctx.save_for_backward 保存 backward 真正需要的 Tensor。保存过多中间量会增加显存占用,保存过少则只能在反向时重算。更完整的框架集成可以通过 PyTorch dispatcher 注册 CPU、CUDA 与 Autograd 实现。
单元测试
GPU 算子最方便的 reference 往往是 PyTorch 自带实现。测试给两边相同输入,再比较输出与梯度。
一次随机输入通过并不充分。边界尺寸最容易暴露索引错误,例如元素数刚好等于 block size、刚好多一个元素、某一维为零,以及矩阵边长无法整除 tile size。
接口与边界
| |
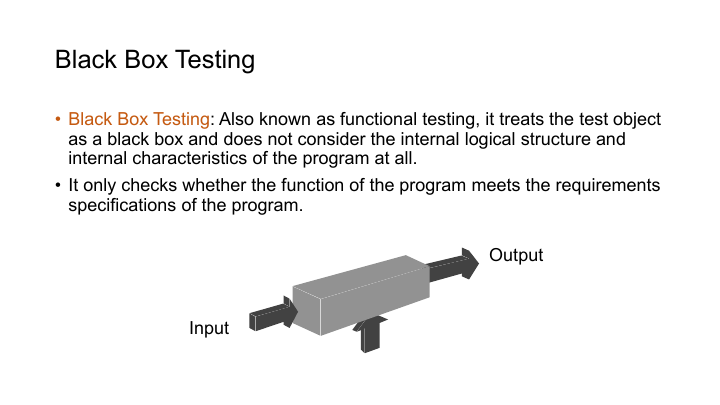
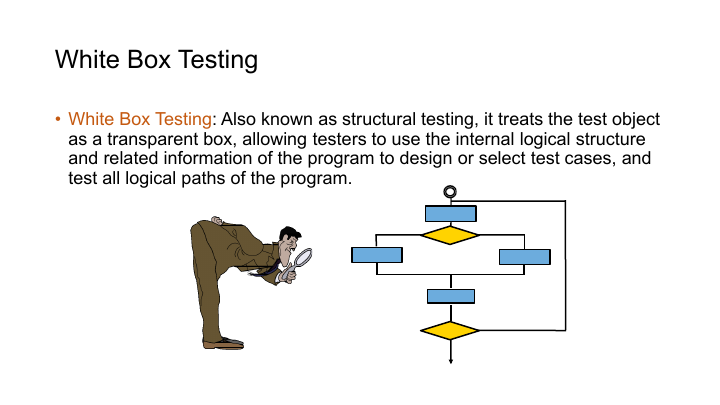
黑盒测试只验证公开输入输出,适合与 reference 对拍。白盒测试根据实现路径构造样例,例如专门跨过 tile 边界、触发有无 bias 分支,或者让最后一个 block 只有一个有效 thread。
浮点结果使用 torch.testing.assert_close。容差要与 dtype 和归约长度相符。float16 的累计误差通常大于 float32,但把容差设得过宽会掩盖漏项和错误索引。
测试工具
unittest.TestCase 采用 xUnit 的组织方式。多项测试都要创建相同输入或初始化同一套扩展时,可以把这部分准备工作放进 setUp,把临时文件、环境变量和外部资源的清理放进 tearDown。它们会在每个 test method 前后各执行一次,前一项测试留下的状态不会直接流入后一项。
| |
初始化代价很高的只读资源可以放进 setUpClass,它在整组测试开始前运行一次。可变的 GPU buffer 不宜在测试间直接共享,否则上一次 kernel 的异步执行或原地写入可能让失败结果依赖测试顺序。
Line coverage 只说明某行代码执行过,branch coverage 进一步检查条件的真假分支。它们都不能证明数值结果正确。一个越界 kernel 可能碰巧在当前输入上没有报错,一条归约路径也可能执行完整却漏加最后一个 tile。覆盖率适合寻找从未触达的区域,结果仍要靠 reference、边界样例和梯度检查判断。
Mock 用来替换测试对象之外的依赖,例如远程存储、时钟或 RPC client。测试 CUDA 算子时不应把 kernel 本身 mock 掉,否则只验证了 Python 包装层;可以 mock 的是下载输入、写日志或上报指标等外围行为。这样既保留算子的真实执行,也不会让单元测试依赖网络和外部服务。
梯度检查
Backward 可以直接与 reference 比较。
| |
torch.autograd.gradcheck 使用有限差分检查解析梯度,通常要求 double precision 与很小的输入。
| |
不可导点附近的数值梯度会不稳定。测试 ReLU 时应避免输入恰好为零,或明确约定该点采用哪一侧导数。
CUDA 调试
Kernel launch 异步返回,测试若只构造输出而不读取它,越界访问可能到后续用例才报错。调试测试可以在自定义算子后调用 torch.cuda.synchronize(),把错误定位到当前用例。
还可以临时设置 CUDA_LAUNCH_BLOCKING=1,让每次 CUDA 调用在返回前完成。这样 traceback 更接近真正出错的 kernel,代价是失去异步执行,不能用这种模式测性能。能够稳定复现越界或未初始化读取时,可再用 compute-sanitizer 检查 global memory、shared memory 与同步错误。
一次非法访存可能让当前 CUDA context 进入错误状态,后面的测试即使代码正确也会继续失败。涉及故意触发设备错误的用例最好放进独立进程,主测试进程只检查子进程的退出状态与错误信息。这样错误不会污染整组用例,也能区分 kernel 失败和测试框架本身的问题。
性能测试、显存泄漏检查和多 stream 并发测试不应与普通功能测试混在一起。它们运行时间长,环境依赖也更强,适合单独标记并在稳定硬件上执行。